A LIVING HISTORY BLOG.

18TH CENTURY LIVING HISTORY IN AUSTRALIA.
Showing posts with label carrying. Show all posts

Thursday, 11 July 2019

Trail food bags & containers.


Trail Food Bags & Containers.
 "I have travelled with neere 200. of them at once, neere 100. miles through the woods, every man carrying a little Basket of this [Nokehick] at his back, and sometimes in a hollow Leather Girdle about his middle, sufficient for a man three or foure daies. With this readie provision, and their Bow and Arrowes, are they ready for War, and travell at an houres warning. With a spoonfull of this meale and a spoonfullof water from the Brooke, have I made many a good dinner and supper."

A KEY into the LANGUAGE OF AMERICA By Roger Williams  1643. 
https://quod.lib.umich.edu/e/eebo/A66450.0001.001?rgn=main;view=fulltext

 If their imperious occasions cause them to travell, the best of their victuals for their journey is Nocake, (as they call it) which is nothing but Indian Corne parched in the hot ashes; the ashes being sifted from it, it is afterward beaten to powder, and put into a long leatherne bag, trussed at their backe like a knapsacke; out of which they take thrice three spoonefulls a day, dividing it into three meales. If it be in Winter, and Snow be on the ground, they can eate when they please, stopping Snow after their dusty victuals, which otherwise would feed them little better than a Tiburne halter. In Summer they must stay till they meete with a Spring or Brooke, where they may have water to prevent the imminent danger of choaking. With this strange viaticum they will travell foure or five daies together, with loads fitter for Elephants than men. But though they can fare so hardly abroad, at home their chaps must walke night and day as long as they have it. They keepe no set meales, their store being spent, they champe on the bit, till they meete with fresh supplies, either from their owne endeavours, or their wives industry, who trudge to the Clam-bankes when all other meanes faile. Though they be sometimes scanted, yet are they as free as Emperours, both to their Country-men and English, be he stranger, or neare acquaintance; counting it a great discourtesie, not to eate of their high-conceited delicates, and sup of their un-oat-meal'd broth, made thicke with Fishes, Fowles, and Beasts boyled all together; some remaining raw, the rest converted by over-much seething to a loathed mash, not halfe so good as Irish Boniclapper.
Chap. VI.
Of their dyet, cookery, meale-times, and hospitality at their Kettles.
The Project Gutenberg EBook of New Englands Prospect, by William Wood Wood's New England's Prospects 1634.

Sunday, 31 March 2019

Gourd Water Bottles. Were They Sealed?

Water bottle gourd found at Bents Fort.

17th & 18th Century water & wine gourds.
Were they lined inside?
To date I have not been able to find any primary documentation suggesting that water bottle gourds were actually sealed inside. However, this does not mean that you can’t seal the inside if you so wish. A close friend of mine purchased a gourd water bottle from a living history trader in America, & it grew mould inside.

“Now we are ready to make the canteen capable of holding liquid without it tasting like swamp sludge. In this procedure I use paraffin wax and a heat source. As you all should know paraffin is extremely flammable and it can be dangerous if used carelessly so I'm not responsible if you flame your gourd, kitty or your humble abode in this next step.
I use pure canning paraffin as opposed to beeswax because beeswax can make the water sort of taste well, like beeswax. Gourds I have waxed with this method have held out over ten years with its original application, however the larger, more often used storage bottles I usually rewax every few years until they get too heavy from all the wax coatings.
The initial waxing is the most important since this can never be undone or redone. So take care - be careful - take your time and you will have success. I use an electric stove and oven in this process so there is no open flame. If you choose to do this on a gas stove it could be dangerous, so please take care.
Get your gourd, a coffee can and a cork that fits the gourd. Also, some towels or rags to handle the hot gourd will be necessary. I set my oven on 250-275 degrees and place the dry and cleaned gourd on the middle rack. Then I take a coffee can which is clean and bend a spout in its side to use as a pouring aid. In this can I carefully melt down two hunks or slabs of wax. When melting wax watch it carefully. Melt at low heat and just as the last solid bit disappears it is ready. If you leave wax to heat too long you may lose track of how hot it is getting and it could burst into flames. As soon at the last traces of wax just disappear in the can take it off the heat. From here on in this must be done quickly and without hesitation to achieve the initial coating in the gourd.
The gourd is removed from the oven and quickly you will pour the melted wax inside it (not near a source of flame). Put the cork in the hole and start vigorously shaking it for a few minutes until the liquid wax starts to "feel different" as it starts to solidify. Then quickly take out the cork and pour the excess back into the can. Set the gourd aside to cool slowly. Don't touch until fully cool. If you did this initial step correctly all of the pores inside the gourd, including whatever fluff remained, are encapsulated in wax. You can do up to two more applications of wax but do not put the gourd back in the oven because you will undo all your hard work. Just melt the wax in the can as before and pour in the gourd, shake vigorously and pour out. Let the gourd cool thoroughly each time; otherwise, you will remove the previous wax.
All you need now is a new clean cork and a method of carrying it and you have a fine water container. I never used this type of container for spirits because they may adversely affect the wax.
Gourds done this way should be fine holding water during events. My big supply bottle gets filled when I leave home for an event and is not emptied until I return home. The water always tastes fine. There is some maintenance however.
For storage after an event you must drain and dry (no heat) the container thoroughly. Do not put the cork back in unless it has dried for a few weeks. I leave my corks out while in storage. Store in a clean dry area. A damp gourd can form a bit of mold on its exterior while drying in storage (not detrimental). Never expose an empty or partially full container to the sun or leave in a hot tent for any length of time as the wax will melt. Keep containers full and in the shade and this will be no problem. I also have found that some hot paraffin rubbed into the exterior of the gourd during the initial waxing process protects the gourd's exterior as well. If at any time the water in the gourd starts to taste foul this would indicate that it is time to reapply a wax coating on the inside. (Follow the instructions for repeated applications of wax)”.

“Bottle Gourds – a natural alternative, one of the things we know about the Dutch that inhabited New Jersey at this time is that they were resourceful and not a wasteful lot. A Gourd Canteen would be cost effective to make though they are fragile.

This first step is to procure a dried bottle gourd. You can either grow your own from seed or look for them at the farm stand in the fall. Your gourd must then be placed in a dry location and be allowed to thoroughly dry out. Once you can hear the seeds rattle inside, clean the outside of the gourd with soap and water so the mold that is on the outside comes off. Next, you want to make sure you are outside and have some sort of breathing mask on. Drill a hole on the top of the gourd (The dried gourd particles inside are not good to breath in, thus why it’s important that this is done outside, along with wearing protection over your mouth), this whole will be used as your opening to dispense water as well. You can then put a few rocks into the gourd, shake them around and this will help to loosen any other objects inside the gourd. To water proof your canteen, some recommend a natural material, like bees wax. Working with bees wax is very hot so be careful. Melt the wax and pour it into the gourd. Shake the gourd around to have even coverage and drain the wax before it dries. Your gourd bottle is now water proof, you just need a cork for the top and you have a very authentic canteen. The fun part of Bottle Gourds is that if you break it, you can always grow more”.
Beeswax was used for sealing the inside of water vessels very early on in history.

“While it’s hard to pin specific dates when archaeologists take us this far back in history, we can say with certainty that the Ancient Georgians were using these large, beeswax coated, earthenware vessels as early as 6,000 BC”.
More gourd history & uses:


Beggar in soldiers clothing by Marquard Wocher 1760-1830.


Monday, 31 December 2018

Making A Powder Horn.


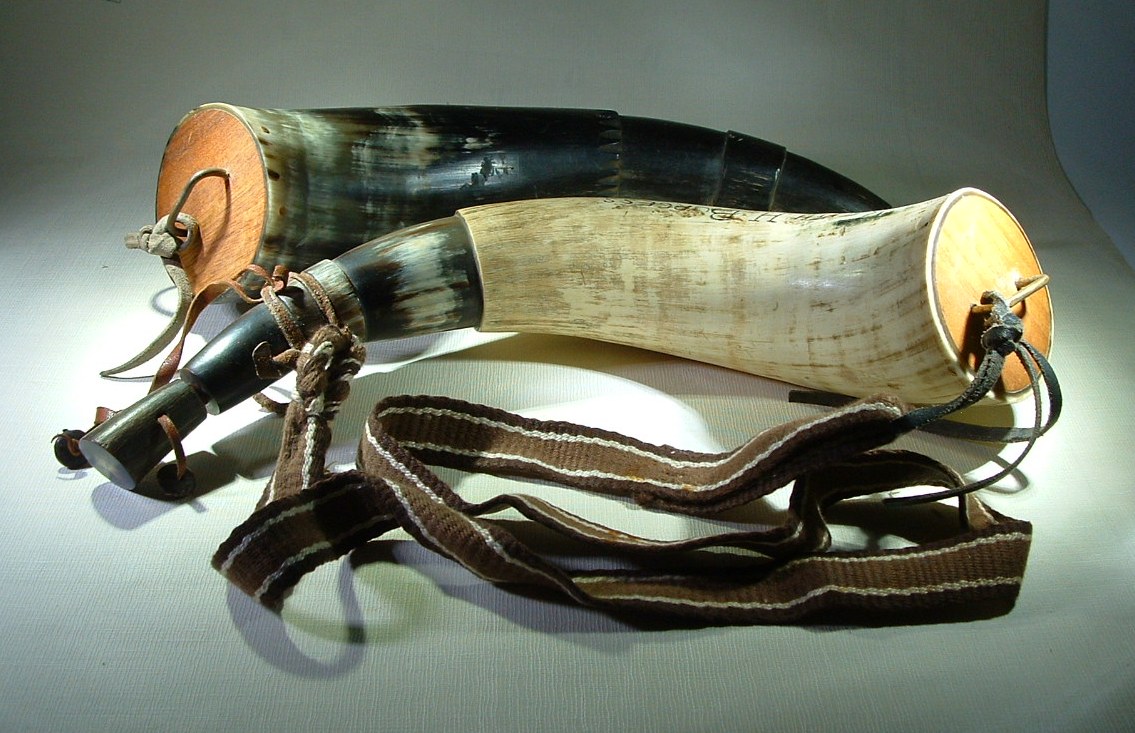
I have had a request to demonstrate how to make a powder horn by one of my video channel followers, Tony, but I do not have the time at present or in the near future to make a video of this, so I am going to try & explain how it is done here with images.

The very first thing I do is cut off the tip of the horn & drill the hole for the pouring spout. The reason for this is that if I make a mistake drilling the spout, then at least I have not wasted much time & I can start again with another horn. I recommend that you use hand tools as I do & take your time getting it right.

Cow horns are the best choice for a powder horn, bull horns tend to have less hollow space & more solid horn extending from the tip into the horn.


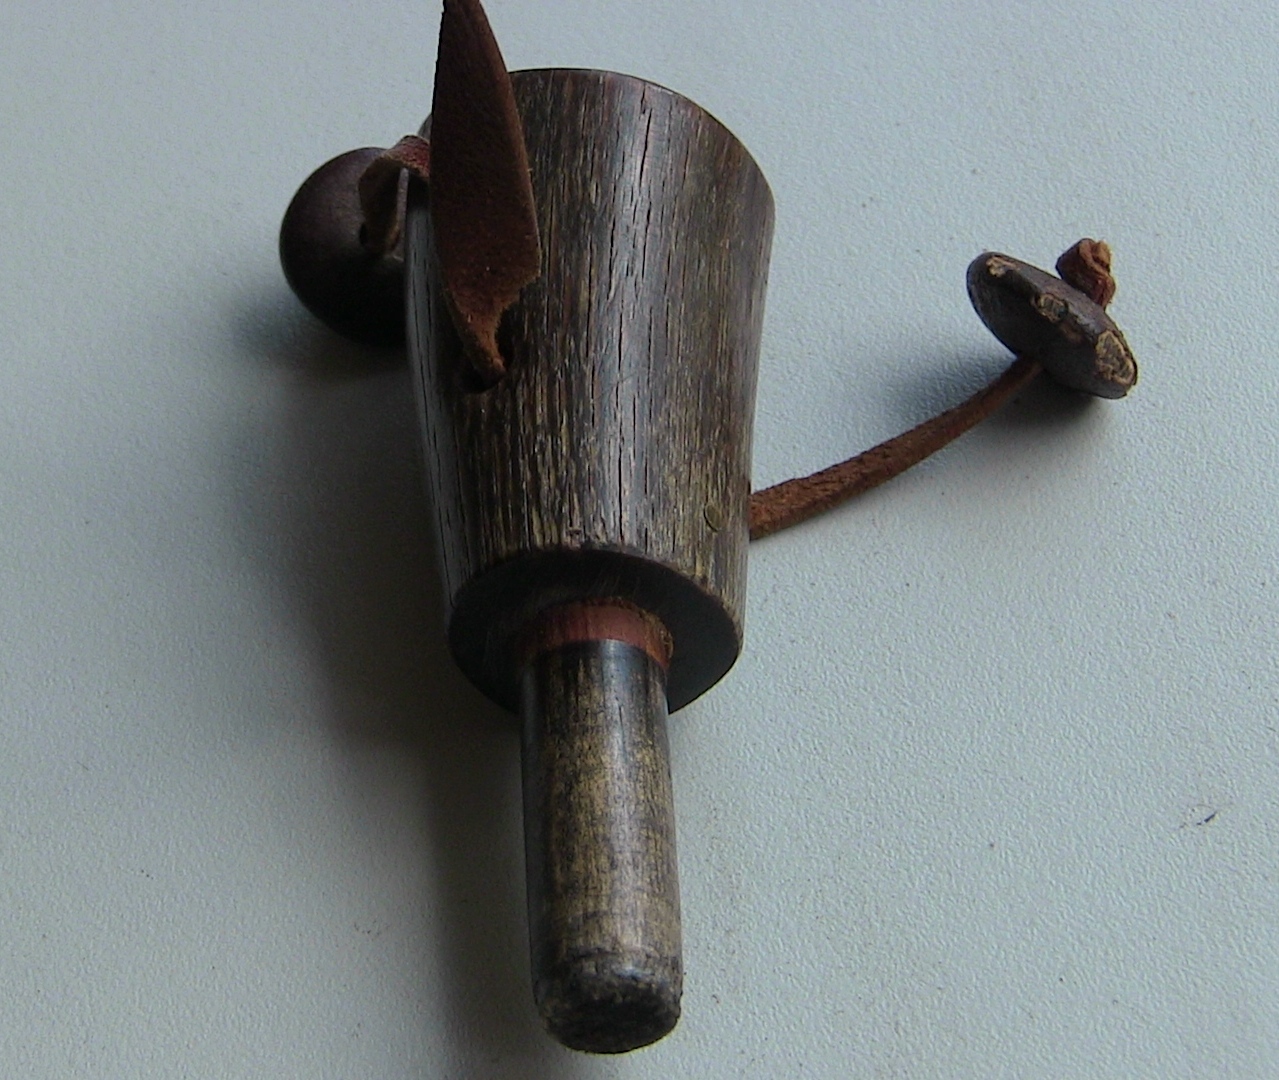
You can make the hole any size that suits the horn, from a 1/4 inch to 1/2 an inch. You can use a piece of dowel for a plug, or you can make your own plug. The plug will need to be slightly tapered so that it will fit securely into the spout. Making the spout plug can be done at any stage, it is the last thing I do when making a horn.


I used the tip I cut from this horn to make a cap for the spout plug.

Next I cut off the base plug end of the horn to get rid of any ragged edges. This image shows the base of an original horn & base plug. 

I then choose the wood for my base plug. It can be of any timber you wish, a board from the local hardware store, or you can rive a board of your own. Place the base of the horn on the wood board & draw around it with a pencil. Next cut out the shape you have drawn.

I shape the base plug with a horse hoof rasp, shaping it to the concave of the inner part of the horn. Every now & then I try the plug in the base of the horn & make a pencil mark around the plug at the edge of the horn so I can see where I need to remove wood.
When it is close to fitting, I finish with sand or glass paper for a smoother finish. Once the plug fits nicely in the base of the horn, I melt beeswax around the edge of the base plug & push it into the horn.


DO NOT glue the base plug to secure it in the horn, this base plug also acts as a safety release valve if the horn should ever take a spark & explode. Rather than the horn shattering into your side, the pressure from the explosion will blow the base plug out of the horn.

Secure the base plug with 4-6 metal or wooden pins.


This horn sent to me from Scotland uses small tacks to secure the plug. Once this part of the making is done, blow into the horn to make sure it is totally sealed. If air escapes around the base plug, simply melt some more beeswax around the edge & rub it in with your hand.

Next you need to add a staple to the base plug to secure the carry strap to. You also need to shape a groove around the horn at the spout end to secure the carry strap. This is a good time to file any design into the horn if you so desire, or you can just leave it plain. All shaping I do with a horse hoof rasp, a round bastard metal file & a fine flat metal file.


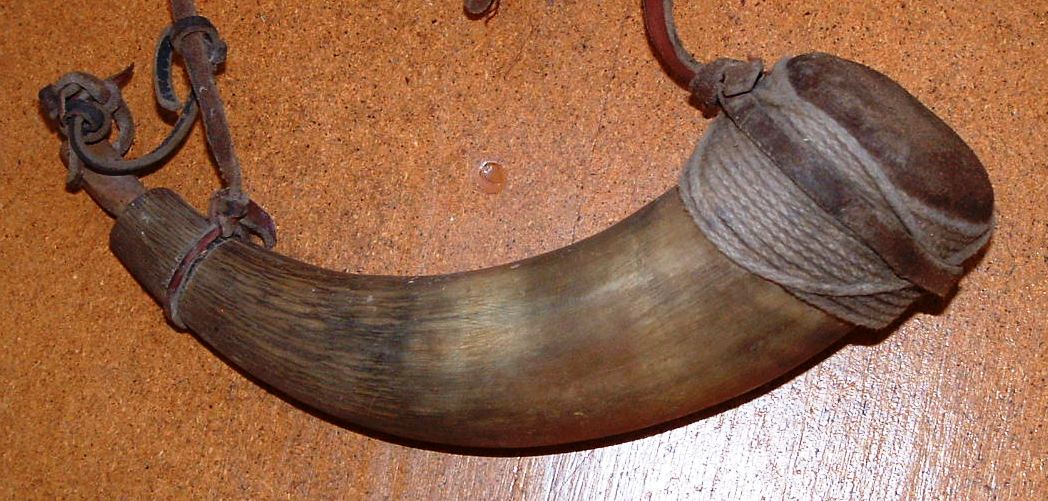
This lower horn was the very first horn I made when I had few tools to work with out bush, so I made a leather base cover instead of a wooden plug. The spout plug I carved with a clasp knife.

The final polishing of the horn I do with wool fleece & wood ashes as per original horn work in the 18th century.

If you have any questions, please do not hesitate to contact me.

Keith.


Sunday, 18 November 2018

The Gunpowder Bag.


Two of the author's five leather gunpowder bags.

A gunpowder bag is used for carrying extra gunpowder on extended journeys into wilderness area, or when one plans to be living in the wilderness long term. A leather bag of gunpowder is far lighter to carry than multiple powder horns.

The Gunpowder Bag.
   takes fire readily from the spark of a steel: but it is much improved by being kept dry in a bag that has contained gunpowder.”
Samuel Hearne, Northern Canada, 1772.
A hundred miles upstream from Jamestown, on an exploring journey by canoe, Smith was badly burned and injured by the explosion of a gunpowder bag.

Supplies for 24 Abenakis and Iroquois who have joined our party:
24 pounds of gunpowder in one bag of half an ell
Supplies for the six militia men: 6 pounds of gunpowder in bags of one eighth of an ell.
1756-1760 journal of Louis Antoine de Bougainville
France, Archives de Colonies series C11A, volume 117, folios 191v to 194, National Archives of Canada, microfilm f-118.

  15           Leather Powder Bags 
From American Fur Co. Papers. Vol. Y, Z. Missouri Historical Society
Invoice of Sundry Merchandise furnished Rocky Mountain Outfit 1837 under charge of Fontenelle, Fitzpatrick & Co.

"He thinks every man should have a wallet of Oznabrigs to carry his provisions in when they leave their horses at the passes of the mountains, and two pair of mockasheens, that blankets would be wanted and clasp knives, thread for the linen and woolen bags for transporting the powder when taken from the waggons...................
Letter of Judge Henderson to Propietors remaining in North Carolina
Boonsborough June 12, 1775.

"Wednesday Morning a sorrowful Accident happen'd at the House of Cap. Thomas Homans in the westerly Part of this Town near Hooper's Meeting House: A small Quantity of Powder (suppos'd to be about a Quart) in a Leathern Bag, having been some time since put up on the Jam of a Chimney in a Chamber wherein they had been us'd to make a Fire, and the Family being about moving into the Country, did not suppose they should every have Occasion for a Fire there: But a young Child being out of Order two or three Days ago, they made a Fire in the same Chimney, and unhappily forgot the Powder…….
The Pennsylvania Gazette
April 12, 1739
BOSTON, February 26.