
Showing posts with label making. Show all posts
Showing posts with label making. Show all posts
Sunday, 23 February 2020


Tuesday, 10 December 2019
Students learn life as 18th century child. Experimental Archaeology.

Students dressed in 18th century clothing making an apple Pomander Ball.
Monday, 31 December 2018
Making A Powder Horn.
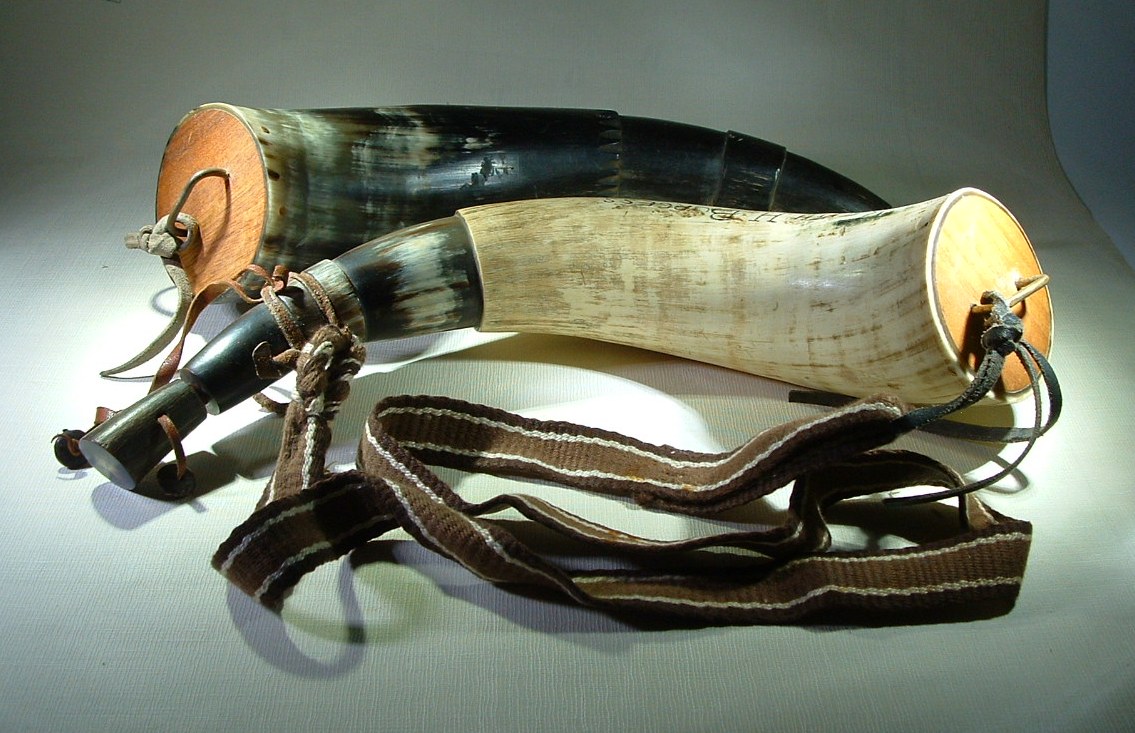
I have had a request to demonstrate how to make a powder horn by one of my video channel followers, Tony, but I do not have the time at present or in the near future to make a video of this, so I am going to try & explain how it is done here with images.
The very first thing I do is cut off the tip of the horn & drill the hole for the pouring spout. The reason for this is that if I make a mistake drilling the spout, then at least I have not wasted much time & I can start again with another horn. I recommend that you use hand tools as I do & take your time getting it right.
Cow horns are the best choice for a powder horn, bull horns tend to have less hollow space & more solid horn extending from the tip into the horn.

You can make the hole any size that suits the horn, from a 1/4 inch to 1/2 an inch. You can use a piece of dowel for a plug, or you can make your own plug. The plug will need to be slightly tapered so that it will fit securely into the spout. Making the spout plug can be done at any stage, it is the last thing I do when making a horn.

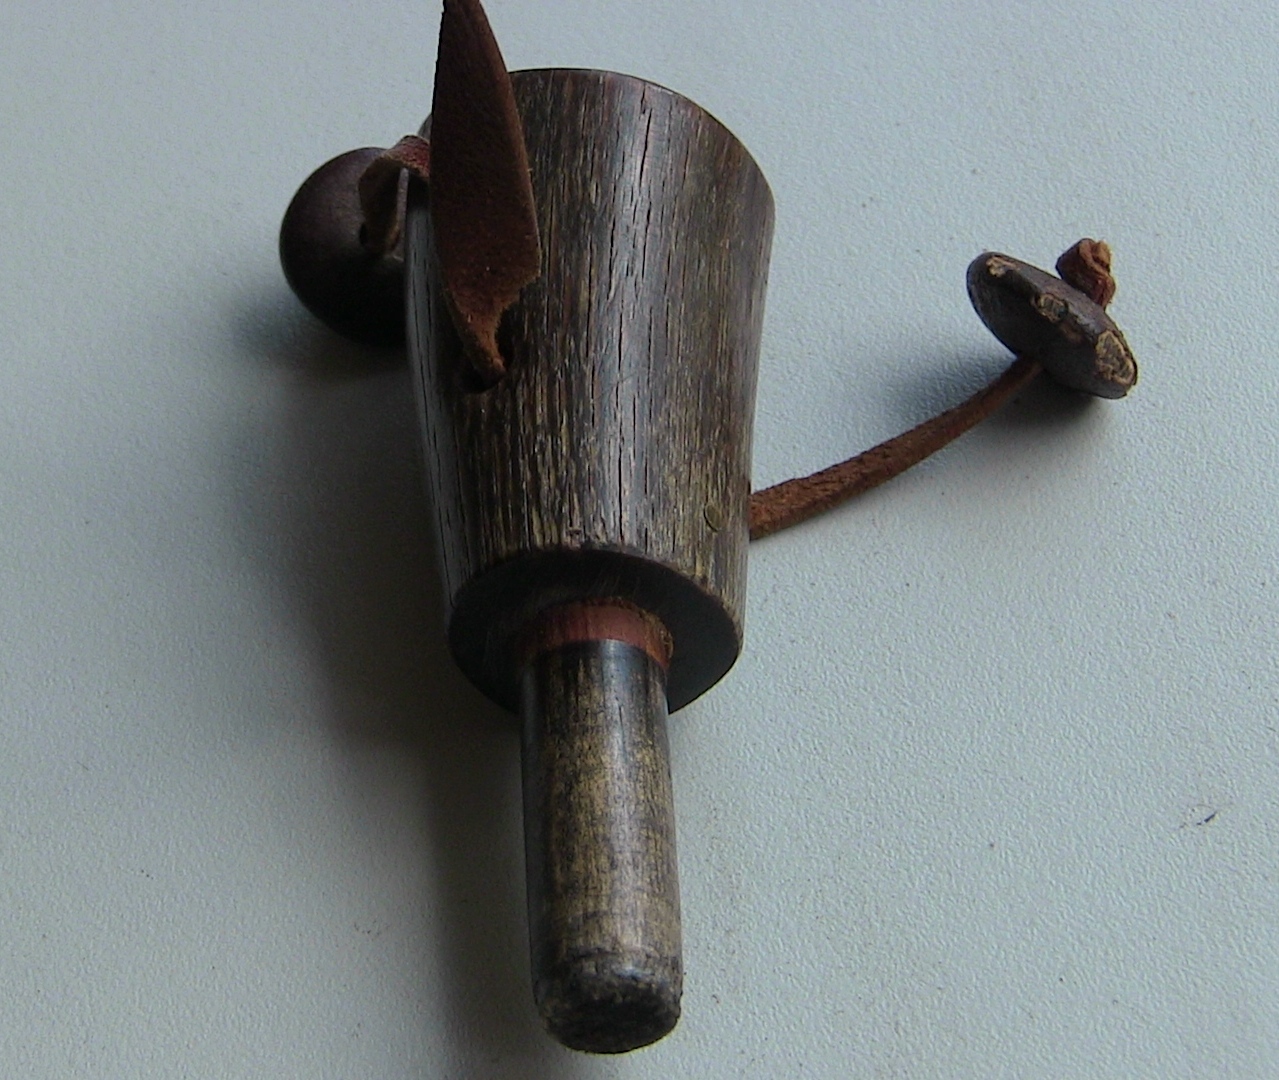
I used the tip I cut from this horn to make a cap for the spout plug.

Next I cut off the base plug end of the horn to get rid of any ragged edges. This image shows the base of an original horn & base plug.
I then choose the wood for my base plug. It can be of any timber you wish, a board from the local hardware store, or you can rive a board of your own. Place the base of the horn on the wood board & draw around it with a pencil. Next cut out the shape you have drawn.
I shape the base plug with a horse hoof rasp, shaping it to the concave of the inner part of the horn. Every now & then I try the plug in the base of the horn & make a pencil mark around the plug at the edge of the horn so I can see where I need to remove wood.
When it is close to fitting, I finish with sand or glass paper for a smoother finish. Once the plug fits nicely in the base of the horn, I melt beeswax around the edge of the base plug & push it into the horn.

DO NOT glue the base plug to secure it in the horn, this base plug also acts as a safety release valve if the horn should ever take a spark & explode. Rather than the horn shattering into your side, the pressure from the explosion will blow the base plug out of the horn.
Secure the base plug with 4-6 metal or wooden pins.

This horn sent to me from Scotland uses small tacks to secure the plug. Once this part of the making is done, blow into the horn to make sure it is totally sealed. If air escapes around the base plug, simply melt some more beeswax around the edge & rub it in with your hand.
Next you need to add a staple to the base plug to secure the carry strap to. You also need to shape a groove around the horn at the spout end to secure the carry strap. This is a good time to file any design into the horn if you so desire, or you can just leave it plain. All shaping I do with a horse hoof rasp, a round bastard metal file & a fine flat metal file.


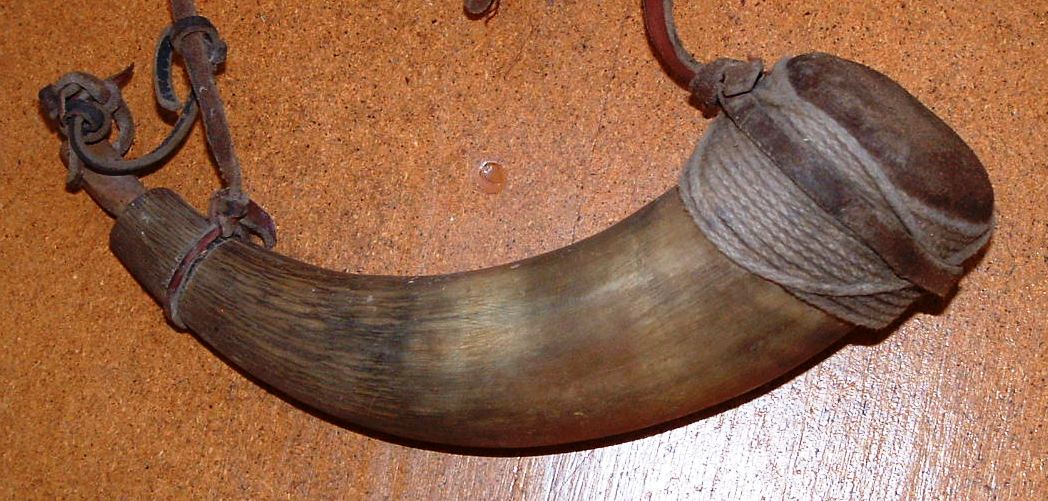
This lower horn was the very first horn I made when I had few tools to work with out bush, so I made a leather base cover instead of a wooden plug. The spout plug I carved with a clasp knife.
The final polishing of the horn I do with wool fleece & wood ashes as per original horn work in the 18th century.

If you have any questions, please do not hesitate to contact me.
Keith.
Monday, 2 April 2018
Slide Carrs & Drag Carts.


From some accounts the slide carr or drag cart was one of the earliest known forms of transport. These were certainly in use in Europe, Ireland, Scotland & Wales from roughly the 16th century to the early 20th century. These carts or carrs could be drawn by horse, dog or by people.
I have reached that stage where I am not as sure on my feet anymore, & carrying a pack of any weight just adds to my difficulty if I should trip! So I decided to make myself a drag cart. My Mother was Welsh, so it seems only fitting that I should make a woodland version of the Welsh drag cart.


Drags &
Slide Cars
The slide car was a wooden framework that was dragged at an angle
with one end on the ground and was pulled by a horse between the shafts: it was
normally used for transporting hay.
Jenkins, J Geraint, Agricultural Transport in Wales, (1962), pp.
13-19
1732, Ireland
and comparison with Wales
There are no Carts or Waggons here [in Ireland], they have Carrs,
which are a kind of Sledges, set on two solid wooden Wheels straked with Iron,
& drawn by a single horse; they carry great Burthens, some 600
Weight. They differ from the Welsh Carriages only in This, as They have no
Wheels. These carriages are undoubtedly the Best for preserving the Road.
Loveday, John,
(1711-1789), Diary of a tour in 1732 through parts of England, Wales, Ireland
and Scotland, made by John Loveday of Caversham … Printed from a manuscript in
the possession of his great-grandson J. E. T. Loveday, with an introduction and
an itinerary, (Edinburgh: 1890), 31st May,1732
1768
Glamorganshire
Most of their draughts are performed by one horse in such a sledge as
this [drawing of a drag cart lettered a to d] aa the shafts like those of a
waggon or cart which slide on the ground on the ends bb. C is a semicircular
hoop from shaft to shaft, to keep in the sacks or bundles of hay or wood etc.,
which is laid on the cross bars dd. The machine is light and much preferable to
carrying the weight on the back.
Young, Arthur,
(F.R.S., Secretary to the Board of Agriculture), A Six Weeks Tour through the
Southern Counties of England and Wales, 1stedition, London, 1768, pp. 110-111
1767 between
Edwinsford and Hay
[They use a] car which I believe is the oldest and simplest
construction of a carriage, that is in use anywhere. It is composed of two
shafts, in length, about 11 feet, upon which are nailed 5 or 6 cross bars, in
length 3½, which serve to support the weight which is to be carried, which is
hindered from slipping off behind, either by three half hoops interlaced and
fastened into holes in the last bar, or by two prongs of wood fastening in the
shafts, with cross pieces between them ; the ends of the shafts are sloped off
; and trailing upon the ground serve instead of wheels : the harness consists
of a saddle, with a niche across the middle, into which a wythe twisted and
fastened into the fore part of the shafts, hitches : the horse has also a
collar of straw, and another of wood over it, into which are fastened two rings
of iron, long enough to receive the end of the shaft , which being put through
the ring, is hindered from returning by a small peg of wood, which fastens into
a hole made for that purpose. [Drawing (loose) and two little sketches of the
car included in the text.]
Banks, Joseph,
Journal of a Tour in Wales, 1767-1768. “The copy of a Journal of an Excursion
to Wales, &c., by S.S. Banks began August 13th, 1767, ended January 29th,
1768”, NLW MS 147C (transcribed by his sister S. S. Banks from the original now
in the University Library, Cambridge MS Add 6294 (2), p. 51
1775 near
Newport, Monmouthshire
Hitherto there is very little appearance of either different manners
or language. Very few of the people speaking Welsh. We saw a few slide carrs
such as are used in Ireland but these are not uncommon in Gloucestershire.
Grose, Francis,
[Journey to South Wales, 1775], British Library, Add. MS. 17398, f. 67
It is enclosed
on the land side by a steep and high mountain, to be ascended only by narrow
paths traversing its sides, by which the inhabitants convey their fuel of turf
on slide cars composed of two poles, fastened by rungs in the hinder
part, of which is placed a wicker creel, about a yard square; having no wheels,
it does not press on the ponies which draw it downwards, and it is so light as
to be easily drawn up when empty.
The type of traffic on the turnpike roads was also a major factor in
their condition. In 1729, at the beginning of the turnpike era, the vehicles
which were normally used for the transport of goods could be categorised into
three types, the slide cart, the truckle cart and the wheel car. The Irish
slide cart was a wheel-less vehicle, it had two long straight posts which were
drawn or dragged by the drawing horse. At the bottom of each post, the wearing
end, was a replaceable shoe. Containers were attached to the posts into which
the load which was to be transported was placed. These vehicles were most
suitable for use on the land or in mountainous areas as the posts caused a lot
of damage to the road surfaces.
The modern Irish name for this wheelless cart is the same
as the old Gaelic name, Carr Sliunain. Dr. Sullivan J states
that there is no reason to suppose that the Irish Carr is a
loan-word from the Latin Carrus, the stem Car being prob-
ably common to the Latin, the Germanic, and the Celtic
languages.
the Kintail Highlanders, if they used wheeled carts
to do the work they require of their wheelless carts. Indeed,
they could not so use them, except by putting the drag on hard
and fast — being first at the trouble of getting wheels, and then at
the trouble of preventing them from turning."
The same argument can be applied to Ireland. In a very
hilly country half the time one is going up-hill and the
other half down-hill; when going up-hill there is no load,
and consequently the slide-car, being so very light, is prac-
tically of no weight for a horse. Coming down-hill with a
load a rigid vehicle has to be employed in any case, and so
the slide-car is equally efficient, the chief drawback being
that it can carry so little, but this is not of much account in
small holdings. The slide-car has, further, the great recom-
mendation of being made easily and cheaply without requir-
ing the services of a skilled carpenter or wheelwright. It is
also as easily, repaired, and all the materials are ready to
hand.
It is also interesting to note that these very primitive
carts can be constructed entirely of wood and thongs, or
ropes, and there is no necessity for any metal to be em-
ployed.
THE STUDY OF MAN
The slide car was a wooden framework that was dragged at an angle
with one end on the ground and was pulled by a horse between the shafts. It was
used for transporting hay.
Jenkins, J Geraint, (1962), Agricultural Transport in Wales, 13-19
A G Prys-Jones, The Story of Carmarthenshire, Volume 2, From the C16
to 1832 (Llandybie, 1972), illustration 17
Thomas Martyn 'machines without wheels, and drawn by one horse'.
Martyn, T., A Tour of South Wales, [1801], NLW MS 1340C, p. 67
A meadow ... produced a little crop of grass that the inhabitants
were busied getting in. This labour was performed by men, women and children,
all actively employed; some of whom carried it home on their shoulders, others
in hand barrows whilst a third party filled and drove the sleds made use of in
Wales, which drag upon the ground without wheels, and are drawn by a little
pony.
Warner, Second Walk, p. 171
SCOTLAND
In those roadless days certain primitive vehicles also had been
developed, how far back one cannot tell. Sledges were made of two sapling
trunks. The thinner ends were fastened to the horse on each side like shafts,
while the thicker ends dragged along the ground and slats or boards were
fastened between them upon which the load rested. They were so suitable for use
on steep slopes that in Kintail and the Gairloch districts they had only just
gone out of use about thirty years ago (late 1800s) when I was enquiring about
them. In earlier times they were also made with a sort of frame for carrying
peats, but as roads penetrated the country these sledges went out of use. When
Hugh Miller took the newly made road to the west to work in Gairloch in 1823 he
noticed two abandoned Highland carts lying beside it. In Theatrum Scotiae by
John Slezer (1694) there are illustrations of sled-carts (Arbroath) and there
is also an illustration of a sled in Burt’s Letters from the North of Scotland
as related by Edmund Burt.
Grant, I.F., Highland Folk Ways, (1961)
The range, evolution, and historical sequence of farm transport on the
Island from the seventeenth to the twentieth century is discussed in this
paper, in the context of the development of the road system and capacity of
horse power. Human power resources included the use of the creel; thereafter
the sledge and various forms of early cart, specifically the slide carr and the
Irish carr, Island variations on the Celtic diaspora of such vehicles. The
influence of the spread of the ‘Scotch cart’ is considered, and the evolution
of the hay bogey and especially the ‘stiff cart’, a distinct type of cart (or
at least a distinct nomenclature) associated with the Isle of Man.
At the time of this survey: 1971-1981, it was still possible to see
in everyday use in Tuscany a most remarkable variety of archaic forms of rural
transport, especially in districts where peasants have been tenacious enough to
resist emigration. These vehicles range from the simplest plough-carrying
slide-car
I have often counted seven or eight slide-cars and carts in a single
farmyard; a situation certainly uncommon anywhere else in Europe today.
The above-said section of the Apennines, from Colle di Cadibona to
Montefeltro, constitutes the land of the Italian slide-car.
Where opinions may vary, there seems to be general agreement on some
aspects of the problem: all researchers seem to agree that 'A' framed
slide-cars, or 'travois' types of vehicles, must have played an important role
in the evolution and development of carts and waggons in ancient Eurasia
(Piggott, 1968).
In the Italian dictionary the slide-car is generally called with the
Tuscan word TREGGIA
In almost all Indo-European languages, however, we find the same
roots: Tuscan =TREGGIA or TRAINO; French = TRAINEAU; Portuguese = TRENO;
Spanish = TRINEO; English = DRAY or DRAG; Norse = TREKKE; Danish =TRAEKKE;
Dutch = DREGGEN; but in German SCHLITTEN.
Slide-cars are
made of two beams, which can only be pulled at a tilt by animals or persons
from one end. When the two poles are joined together at one end to
form a “A” shape, and attached to the yoke two animals are used. The other type
has instead parallel beams kept apart by means crossbars and drag along the
ground at one end, pulled either by an animal
or person from the other end. The first 6 I refer to as the “A” framed
slide-car, second I refer to as the “H” framed slide-car.
Whereas slide-cars are easily maneuvered in hill country, the sledge
with its rigid structure is a ponderous vehicle with a very large turning-circle,
and is better suitable on plains or open areas (Piggott, 1968).
When one horse, or only one cow, is harnessed on account of the
narrowness of some mountain tracks, the sledge becomes a slide-car. This
version of the vehicle is almost identical to the slide-cars of Wales and
Ireland (Thompson, 1958 – Jenkins, 1962). (Picture 44) This particular
slide-car, unique in Italy, is made of two poles kept parallel by means of
crossbars and, it has a built-up structure, which carries the load. Furthermore,
the two poles are specially chosen from naturally or artificially bent trees
which are adapted in such a way as to making the platform as little tilted as
possible, as one would best appreciate by looking at the drawing.
Rural transport
in Tuscany and the Northern Apennines A contribution to the ethnography of
vehicles.
Tuesday, 5 December 2017

Saturday, 1 October 2016

Thursday, 22 September 2016
Update On Dorset Buttons.


Dorset Buttons.
Dear Keith
It’s very difficult to date a Dorset Button exactly. All I can say is
that there are four different types of Dorset Buttons with many variations
within each type.
1. The first buttons were made with sheep’s horn, fabric and thread
(High Tops and Dorset Knobs)
2. Some used just fabric and thread (Birdseyes and Mites)
Wire rings were introduced in the 1730s and two further types of
buttons were added to the range:
3. Those were made with wire, fabric and thread (Singletons)
4. The Dorset thread button used wire and thread (Dorset Cartwheel
and Blandford Crosswheel)
The earliest example of buttons worked on a wire rings that I have
seen on an item of clothing is in the collection at the Fashion Museum, Bath. A
women’s gown dated 1730-39 which has Dorset Cartwheel buttons worked on wire
rings on each sleeve. I have also seen Dorset Knob buttons used as decoration
on a child’s dress dated 1861-70 in the collection held at the Museum of
London. Dorset Singleton Buttons, also worked on a wire ring, were also used on
many items of clothing.
I hope this helps
Best wishes
Anna
01747 829010
Visit the Cygnet Gallery, Shaftesbury, for a selection of gifts and
kits featuring Dorset Buttons.
http://henrysbuttons.co.uk/worksheets-and-tutorials.html
http://henrysbuttons.co.uk/worksheets-and-tutorials.html
Saturday, 17 September 2016
Tumplines.

Northeastern Woodland Indian Tumpline.

Warrior tie or burden strap, tumpline made of hemp.

Woven burden strap, carrying-strap made of hemp, hair (moose), beads.
Tumpline Article on our Group Forum By Swampfox: http://eighteenthcenturylivinghistory.freeforums.org/tumpline-build-along-t1520.html
Sunday, 3 April 2016
An Update of small shot for Smoothbores.

My last findings during researching lead shot had me puzzled. In George Washington's list of goods he ordered "Drop Shot". This was prior to the invention of the shot tower. Further searching has turned up a couple of interesting facts. (1) Prince Rupert's shot maker, & (2) Prince Rupert's experiment with glass. Prince Rupert melted glass & dropped some into a bucket of water, the result was known as Rupert's Drop. This glass droplet reminds me of the shape of a swan, & it made me wonder if there was any connection between this glass "drop" & the wrongly assumed shape of swan shot?!
It also made me wonder if the term "Rupert's Drop" had anything to do with the term "Drop Shot" used by George Washington. Certainly the method used in making "Rupert's Shot" could be termed "Drop Shot". Here then below is the information I have collected to date, I hope you find it of some interest & perhaps of use.
Keith.

Prince Rupert of the Rhine, inventor of Rupert's Shot & Rupert's Drop.

Rupert's Drop.
Drop Shot.
Markham noted the superiority of “haileshot or drop-shot”
#4 drop shot that replaced Rupert shot after 1784.
“It was made by pouring moulten lead through a brass colander held
over a bucket of water. The molten lead fell through the holes into the water
forming slightly oval dimpled shot. Rupert shot is frequently found at
Michilimackinac…Some of this shot still has tails, indicating that it was
possibly run at the fort,”
Craft industries at Fort Michilimackinac, 1715-1781,Lynn L. Morand,
Mackinac Historical Parks, Mackinac Island’ MI, 1994, pgs.40-43.
He also invented an improved method for manufacturing shot of
varying sizes in 1663, that was later retained by the scientist Robert
Hooke, one of Rupert's Royal Society friends during the period.[171]
The one great breakthrough in the history of shot making came in
1782, when a British plumber, William Watts of Bristol, received a patent for a
method to produce shot…
Good old WW was a Bristol plumber and in 1782 he discovered a way of
making perfect lead shot.
In 1782 an English plumber named William Watts saw possibility in
that. He realized that if he dropped molten lead far enough through the air,
it, too, would form into spheres. The surface tension of lead is a lot higher
than that of water, so it forms very perfect spheres indeed.
“If you want a scientific display of the dangers of pent-up stress, Prince
Rupert's drops are it. After the trauma of being dropped molten-hot into
a bucket of cold water, these glass balls, named for a 17th-century amateur scientist,”
Rupert's drops are it. After the trauma of being dropped molten-hot into
a bucket of cold water, these glass balls, named for a 17th-century amateur scientist,”
The above comment relates to drops of molten glass, but of course the
same man, Prince Rupert also designed the first Drop Shot by pouring
molten lead through a sieve into a bucket of water. This could explain
Washington’s use of the term Drop Shot before the shot tower was
invented.
Keith. 4/4/2016.
Lead shot was also found at the house sites in various sizes, and of
three basic manufacturing types. Rupert’s shot, which was typically
purchased, was made by pouring melted lead, fluxed with arsenic, through a
colander into tubs of water. The size of the holes in the colander determined
the size of the shot. Rupert’s shot has a small characteristic dimple on it.
Like fish hooks, lead shot was not sold with number sizes as it is today, but
with names corresponding to their intended game. In 18th-century Connecticut,
merchants typically advertised such shot types as “bird,” “duck,” “geese” and
“swan.” Some hunters made their own shot, which they cast into specially-made
shot molds called gang molds. The molds were manufactured from brass or were
homemade, carved out of local soapstone (steatite). Shot was also produced by a
laborious process which involved pounding lead into long rectangular blanks and
then cutting off small cubes of the desired shot size. The edges of this type
of “tumbled shot” were then rounded by rolling them in sand or ash.25
“FIGURE 18 Lead shot and sprue a-f, Rupert shot with characteristic ‘ dimples’, g-h, cast shot, showing mold seams
and sprue nibs, m-p cast musketballs (note teeth marks on p), ), q-s, sprue
from small cast shot, t, shot still attached to sprue”. (image of shot at url
link. Keith.)
Lead Ball and Shot Production.
A final activity related to
firearms was the production of shot and musketballs. Judging from the
accumulation of sprue in the workshop refuse, the majority of early shot was
laboriously cast in gang molds (Figure I8g-1). Rupert shot was also
present, though in lesser quantities (Figure 18a-f). The two types can usually
be distinguiished by the seam and cut-off marks on the cast shot, and the
dimple characteristic of the Rupert process (Hamilton 1980: 13 1-133). This
latter form was made by dropping lead through a heated colander into a pan of
water immediately below. The shot was then graded by sieving (Brown 1980:84).
Whether the Rupert shot was made on the site has not been determined, but the
size distributions of the two are roughly similar, and indicate that they were
functionally interchangeable (Figure 19). Apparently at least three or four
sizes of shot were used at the fort, but the smallest size, at 5 mm was the
most popular, probably for fowling pieces. A reversal in the relative
popularity of shot types occurs in all areas away from the workshop,
particularly the paving of the gateway outside the guard house, indicating
either that Rupert shot was not made at the workshop, or that it replaced cast
shot in Pentagoet 111 (Figure 20). Within buildings, of course, all exposed
Pentagoet I11 shot was melted in the destruction of the fort.
Maintenance and Fabrication at Fort Pentagoet 1635-1 654 Products of
an Acadian Armorer’s Workshop
To make small shot of different sizes; Communicated by
his Highness P.R.
Take Lead out of the Pig what quantity you please, melt it down, stir
and clear it with an iron Ladle, gathering together the blackish parts that
swim at top like scum, and when you see the colour of the clear Lead to be
greenish, but no sooner, strew upon it Auripigmentum powdered
according to the quantity of Lead, about as much as will lye upon a half Crown
piece will serve for eighteen or twenty pound weight of some sorts of Lead;
others will require more, or less. After the Auripigmentum is put in,
stir the Lead well, and the Auripigmentum will flame: when the flame
is over, take out some of the Lead in a Ladle having a lip or notch in the brim
for convenient pouring out of the Lead, and being well warmed amongst the
melted Lead, and with a stick make some single drops of Lead trickle out of the
Ladle into water in a Glass, which if they fall to be round and without tails,
there is Auripigmentum enough put in, and the temper of the heat is
right, otherwise put in more. Then lay two bars of Iron (or some more proper
Iron-tool made on purpose) upon a Pail of water, and place upon them a round
Plate of Copper, of the size and figure of an ordinary large Pewter or Silver
Trencher, the hollow whereof is to be about three inches over, the bottom lower
then the brims about half an inch, pierced with thirty, forty, or more small
holes; the smaller the holes are, the smaller the shot will be; and the brim is
to be thicker then the bottom, to conserve the heat the better.
The bottom of the Trencher being some four inches distant from the
water in the Pail, lay upon it some burning Coles, to keep the Lead melted upon
it. Then with the hot Ladle take Lead off the Pot where it stands melted, and
pour it softly upon the burning Coles over the bottom of the Trencher, and it
will immediately run through the holes into the water in small round drops.
Thus pour on new Lead still as fast as it runs through the Trencher till all be
done; blowing now and then the Coles with hand-Bellows, when the Lead in the
Trencher cools so as to stop from running.
While one pours on the Lead, another must, with another Ladle,
thrusted four or five inches under water in the Pail, catch from time to time
some of the shot, as it drops down, to see the size of it, and whether there be
any faults in it. The greatest care is to keep the Lead upon the Trencher in
the right degree of heat; if it be too cool, it will not run through the
Trencher, though it stand melted upon it; and this is to be helped by blowing
the Coals a little, or pouring on new Lead that is hotter: but the cooler the
Lead, the larger the Shot; and the hotter, the smaller; when it it too hot, the
drops will crack and fly; then you must stop pouring on new Lead, and let it
cool; and so long as you observe the right temper of the heat, the Lead will
constantly drop into very round Shot, without so much as one with a tail in
many pounds.
When all is done, take your Shot out of the Pail of water, and put it
in a Frying-pan over the fire to dry them, which must be done warily, still
shaking them that they melt not; and when they are dry you may separate the
small from the great, in Pearl Sives made of Copper or Lattin let into one
another, into as many sizes at you please. But if you would have your Shot
larger then the Trencher makes them, you may do it with a Stick, making them
trickle out of the Ladle, as hath been said.
If the Trencher be but toucht a very little when the Lead stops from
going through it, and be not too cool, it will drop again, but it better not to
touch it at all. At the melting of the Lead take care that there be no kind of
Oyl, Grease, or the like, upon the Pots, or Ladles, or Trencher.
The Chief cause of this Globular Figure of the Shot, seems to be the Auripigmentum;
for, as soon as it is put in among the melted Lead, it loses its shining
brightness, contracting instantly a grayish film or skin upon it, when you scum
it to make it clean with the Ladle. So that when the Air comes at the falling
drop of the melted Lead, that skin constricts them every where equally: but
upon what account, and whether this be the true cause, is left to further disquisition.
The Project Gutenberg eBook, Micrographia, by Robert Hooke. 17th
century.
Also: By R. HOOKE, Fellow of the Royal Society. First
published in 1665.

This is an image of Peter Goebel's interpretation of Prince Rupert's shot maker.
http://www.goosebay-workshops.com/Militaria
http://www.goosebay-workshops.com/Militaria

This is an image of a hunter shooting ducks on the water, using what was called a "stalking horse". The stalking horse was used as a moving blind so the hunter could move closer to the game.
Tuesday, 1 March 2016
Ships Biscuit.
I have read several recipes for ships biscuit but none of them appear to use the constant kneading or "knocking down" method. Somewhere in my memory I seem to recall that this kneading & knocking down (pounding with the side of a clenched fist) was an important part of making ships biscuit. Anyway, here are the links to three articles on this biscuit.

http://www.westfordminutecub.com/resources/Biscuit+Recipe.pdf
http://colonialbaker.net/A%20Summary%20of%20Reproducing%20the%2018th%20Century%20English%20Sea%20Biscuit.pdf
http://www.theoldfoodie.com/2013/04/ships-biscuits.html

Ship’s Biscuits made by Jeff Pavlik, as featured in John Pavlik, “‘Consisting Merely of Flour and Water’: Reproducing the Eighteenth-Century English Biscuit,” Journal of the Early Americans 1, no. 11 (April/May 2011), 7-11.
http://www.westfordminutecub.com/resources/Biscuit+Recipe.pdf
http://colonialbaker.net/A%20Summary%20of%20Reproducing%20the%2018th%20Century%20English%20Sea%20Biscuit.pdf
http://www.theoldfoodie.com/2013/04/ships-biscuits.html
Succariebread, Field provisions of the 1718 campaign
https://historyhysteria.wordpress.com/2016/02/10/succariebread-fieldprovisions-of-the-1718-campaign/
Thursday, 18 February 2016
The kettle That wasn't.
For some time now I have been trekking without a kettle, mainly because I am trying to make my pack lighter & the brass trade kettle is a little weighty. A kettle is however very useful for collecting rain water, cooking & boiling water. I have been using my tin cup, but found it unsatisfactory for boiling water; awkward to place on the fire. So I started the search for a smaller lighter kettle.
My search came up empty handed, but I did find some interesting items that are period correct, & could be used as a kettle. So here is my creation. I know from my research that tin cups that have presumably lost their soldered handles heating water in a fire have been repaired using wire for new handles, so I decided to make a kettle from what I had available. The work was fairly simple, though I did have some trouble making copper rivets from sheet copper. In the end I used two copper rivets & two iron rivets to attach the bail brackets.


My search came up empty handed, but I did find some interesting items that are period correct, & could be used as a kettle. So here is my creation. I know from my research that tin cups that have presumably lost their soldered handles heating water in a fire have been repaired using wire for new handles, so I decided to make a kettle from what I had available. The work was fairly simple, though I did have some trouble making copper rivets from sheet copper. In the end I used two copper rivets & two iron rivets to attach the bail brackets.


So this is NOT a copy of a period kettle as far as I know, it is simply something I found in a deserted cabin that had been for the most part burnt except for one corner near the fireplace & chimney that was still intact. This kettle is obviously home made & shows evidence of some other type of handle having once been attached to this bowl.


Floris Van Schooten 1585-1655


Cornelis Jacobsz (1570–1643)

18th Century copper cake mould.
http://www.collectorsweekly.com/stories/167433-antique-18th-french-copper-cake-mold?in=1661; 
Diderot Coppersmith.

Detail from Diderot images re coppersmithing above. Note the copper bowl second from right.

Kettle made from a copper helmet.
https://www.pinterest.com/pin/479633429041882527/;
https://www.pinterest.com/pin/479633429041882527/;
Sunday, 24 January 2016
A New Ramrod For My Pistol.
I have made a video on making ramrods this afternoon. Not one that shows the actual making, but a description of the process & a talk on ramrods in general. Right now Part One is still loading, & I have Part Two to edit. But while you are waiting, here are some stills from the video.
Keith.


Keith.

Ramrod with an antler tip.


Subscribe to:
Posts (Atom)