Showing posts with label moccasins. Show all posts
Showing posts with label moccasins. Show all posts
Thursday, 31 August 2017


Saturday, 21 December 2013
The Housewife Sewing Kit and Comfort.
Everything we carry on the trail is for comfort. Different people have different ideas about what was carried by the average woodsman. But with basic items I do not find it hard to make a decision. Take the housewife for instance. We know for a fact that everyone, no matter who they are or what they are sooner or later will need clothing repair. For the woodsrunner it is even more so because of the increased wear and tear involved in the job. Some will say that we can make a needle and the thread when we need it, which is true, but would it be sensible after going to all the trouble to make a bone needle to then not carry it with you so you have to make a new needle each time you need to make new moccasins or repair your present ones?
The answer is no, it would not be sensible, so using the same logic, if you have access to metal sewing needles, why would you not obtain some and carry them with you? The same then applies to the thread, beeswax and maybe spare clothing buttons. It is just plain common sense to carry these items with you.
Here then are some items you may wish to consider carrying with you on the trail. Needles can do double duty used for removing wood splinters. Fine linen thread may be used in an emergency for stitching up wounds. Beeswax used to wax linen thread can also be used to seal tears in your oilcloth after repair.


The answer is no, it would not be sensible, so using the same logic, if you have access to metal sewing needles, why would you not obtain some and carry them with you? The same then applies to the thread, beeswax and maybe spare clothing buttons. It is just plain common sense to carry these items with you.
Here then are some items you may wish to consider carrying with you on the trail. Needles can do double duty used for removing wood splinters. Fine linen thread may be used in an emergency for stitching up wounds. Beeswax used to wax linen thread can also be used to seal tears in your oilcloth after repair.

Plain wood handled awl with wooden sheath.

An antler handled awl made by the author, a waxed linen thread wrapped wooden sheath, and the author's original awl once owned by his Father.
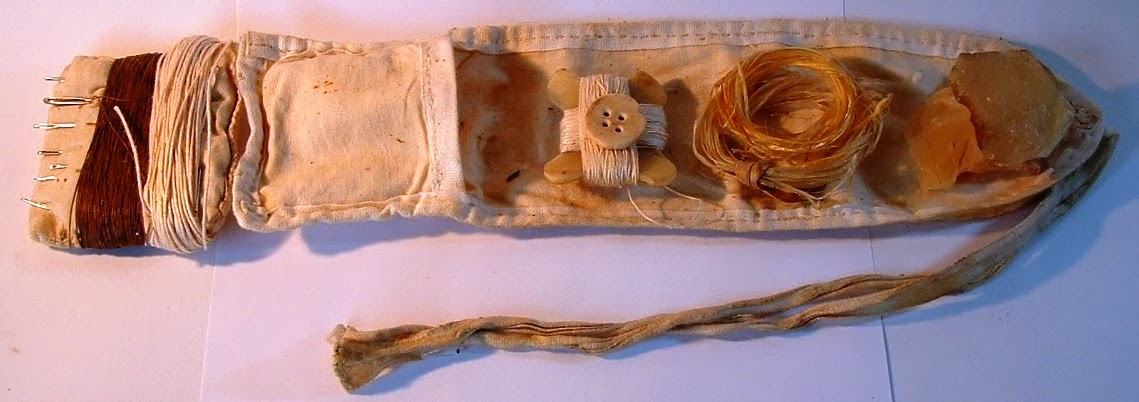
The author's Housewife and contents.

The pin cushion holds a variety of needles and is wrapped in two sizes of linen thread.

More linen thread on a horn thread winder made by the author, and a hand made bone button.

Rolls of animal sinew and rawhide used for repairing moccasins, and a piece of beeswax for waxing linen thread.

Showing the open pocket that holds spare buttons, beeswax and sinew and rawhide.

Showing the housewife rolled up and tied.

Early 18th century case and accessories.

Wooden needle cases.

Sewing items, including needles, straight pins, thimbles, scissors and a bone cap, possibly to a needle case.
Thursday, 1 August 2013
Friday, 14 June 2013
How To Learn Primitive Skills.
I started learning primitive skills way back when I was a youngster. Of late several people have asked me where can they start to learn primitive skills. Here is an index list for my primitive skills DVDs, and the address to order from. There is also a "Buy Now" button to the left of this post.
FIRE DVD.
 MOCCASINS & MORE DVD


FIRE DVD.


MUZZLE-LOADING & MORE DVD

OFF THE GRID DVD.

Saturday, 18 May 2013

Wednesday, 24 April 2013
Canadian Footwear. A PDF.
http://www.colonialbaker.net/Footwear%20of%20Canadiens%20pdf.pdf


My thanks to Brad for the link to this PDF.
Tuesday, 19 March 2013
NARRATIVE OF THE CAPTIVITY OF WILLIAM BIGGS. Part 3.

It is a
law with the Indians when they go to war, if an Indian will
not
obey the counsels and commands of his captain or chief, to kill
them.
When their meat was cooked, they ate very hearty, and when they
were
done eating, three of the Indians got up, put on their budgets and
started,
this young Indian was one of them. I also got up to show a
willingness
to be ready. The old chief told me to sit down, and the
three
Indians started off. In about three or four minutes after we
started,
but varied a little in our course. We had not traveled more
than
one hundred yards when we heard the report of a gun. The old chief
then
told me that they had killed the Indian that wanted to kill me. The
other
two Indians fell in company with us before night. We then traveled
till
about 10 o'clock in the night, when we encamped at a large grove of
timber
in a prairie, about four miles from the edge of the woods; made
no fire
that night. We traveled about forty miles that day. After they
rested
a while they sat down to eat their jirk. They gave me some but I
could
not eat any. After they were done eating, one of the Indians was
sitting
with his back against a tree, with his knife between his legs. I
was
sitting facing him with my feet nearly touching his. He began to
inquire
of me of what nation I belonged to. I was determined to pretend
that I
was ignorant and could not understand him. I did not wish them to
know
that I could speak some Indian language, and understand them better
than I
could speak. He first asked me in Indian if I was a Matocush,
(that
is a Frenchman in English). I told him no. He asked me if I was a
Sagenash,
(an Englishman). I told him no. He again asked if I was a
Shemolsea,
(that is a long knife or a Virginian). I told him no. He then
asked
me if I was a Bostonely, (that is American). I told him no. About
one
minute afterwards, he asked me the same questions over again. I then
answered
him yes; he then spoke English and caught up his knife in his
hand,
and said "you are one dam son of a bitch." I really thought he
intended
stabbing me with his knife. I knew it would not do to show
cowardice,
I being pretty well acquainted with their manner and ways. I
then
jumped upon my feet and spoke in Indian and said manetway, kien,
depaway,
in English it is no, I am very good, and clapped my hand on my
breast
when I spoke and looked very bold; the other Indians all set up
such
ha! ha! and laugh that it made the other Indian look very foolish.
He sat
still and looked very sulky. After they had rested a while, they
began
to prepare to lay down. They spread down a deer-skin and blanket
for me
to lay on. They had tied a rope around my arms above my elbows,
and
tied that rope across my back, and a rope around my neck; they then
tied
the end of another rope behind to the neck rope, then down my back
to the
pinion rope; then they drew my hands forward across my stomach
and
crossed my wrists; then tied my wrists very tight; then tied my legs
together,
just below my knees; then tied my feet together with a rope
round
my ankles; then took a small cord and tied in between my wrists,
and
also between my ankles very tight, in order to prevent me from
drawing
out my hands or feet; they then took another cord and tied one
end to
the neck rope; then to the hand rope; then from the hand rope to
the
knee rope; they then took a rope about six feet long and tied one
end to
the wrist rope, and the other end to a stake about six feet from
me
stretched very tight, and an Indian laid on that rope all night; then
they
took another rope about the same length, and tied one end to the
knee
rope and the other end to a stake, and another Indian laid on that
all
night; then they tied a large half-dressed elk rope, one end to the
back
part of the neck rope which made a knot as big as my fist, the
other
end they tied to a stake about six feet from my head. When they
finished
their tying me, they covered me with a blanket. They tied me in
the
aforegoing way nine nights in succession; they had me stretched and
tied so
tight, that I could not move one inch to turn or rest myself;
that
large knot was on the back of my neck, so that I was obliged to lay
on it
all night, and it hurt my neck very much. I never suffered as much
in the
same length of time in all my life; I could hardly walk when we
got out
to their town. They never made me carry anything except a
blanket
they gave me to keep myself warm, when they took all my clothes
from
me. The Indians carried a deer-skin and blanket all the way for me
to
lodge upon. When my hands and feet became sore with the tying the
Indians
would always pull off my moccasins at night and put them on in
the
morning, and patch them when they would require it.
Saturday, 25 August 2012
Footwear For Travelling.

“Thirsday 23d This day at
about 5 in ye morning
we began to pack up our
bagage in order for marching,
I had my hands Loosned
from behind me after
they presented me with a Considerable quantity
of their bagage to pake
up for my Load to Carrey To
menus, they also took my
Shoes from me & Gave
me a pair of Dears Skin
mogisons Such as they wear
themselves, and Told me
they was better and much
Preferable to Shoes To
march in.”
The Pote Journal 1745.
Tuesday, 17 July 2012
Prolonging The Use Of Your moccasins On The Trail.
There are two ways in which I prolong the use of my woodland centre seam moccasins. One is to sew extra soles on the moccasins, and the other is to carry inner soles in my pack. I also carry spare moccasins tied to my blanket roll.
The leather inner soles I carry are not a permanent repair, but if you have a whole right through the moccasin sole. these will protect your feet until you can make a better repair.


The leather inner soles I carry are not a permanent repair, but if you have a whole right through the moccasin sole. these will protect your feet until you can make a better repair.


Wednesday, 20 June 2012

Saturday, 10 March 2012
A Waterproofing Recipe Of The 18th Century.
Please Note: This is the original text from the book which I scanned, so it is in 18th century script. The small s looks a little like the lower case f but it only has a stroke at the back of the letter, not right through it like the f.


Taken from "An Essay On Shooting" 1789 Edition.

Shoes and moccasins.
Tuesday, 20 December 2011
Thursday, 3 November 2011
Trailer-Cobbling Soles on Moccasins & Shoes.
There are two videos on Cobbling Soles on Moccasins & Shoes, and both are on my Primitive Skills 2 DVD. This is just the first half of the first video.
Wednesday, 5 October 2011
New Primitive Skills DVD Coming. Preview of Making Moccasins 1 of 10.
The pattern making part is yet to be made. My son Kaelem is working as data wrangler on another movie at present, so I can't use him as camera man! I will shoot the intro today, & maybe my wife & I can get the pattern making done on the weekend on our own [no one on camera!].
Here is part one. Once I started this filming, I found there was a lot more information to explain than I realised before hand. This is often the case when teaching such skills. I tend to take a lot for granted still, and don't realise until I get into it just how much is involved. Most of the videos I make because of requests, & some I have thought pointless until I start work on it. I get so used to doing things that I find them quite simple, and fail to realise that even small things can be quite hard or difficult to understand for beginners.
Fitting a flint in the lock of a gun is a typical example, I have fitted more than a few over the last 20 odd years & took the skill for granted. Such a simple process, and yet the comments I got back proved that others had not completely mastered this task. So my videos tend to be long and because of loading times I tend to split them up into parts. I would rather they were longer & more work and make sure I include as much information as possible.
Here is part one. Once I started this filming, I found there was a lot more information to explain than I realised before hand. This is often the case when teaching such skills. I tend to take a lot for granted still, and don't realise until I get into it just how much is involved. Most of the videos I make because of requests, & some I have thought pointless until I start work on it. I get so used to doing things that I find them quite simple, and fail to realise that even small things can be quite hard or difficult to understand for beginners.
Fitting a flint in the lock of a gun is a typical example, I have fitted more than a few over the last 20 odd years & took the skill for granted. Such a simple process, and yet the comments I got back proved that others had not completely mastered this task. So my videos tend to be long and because of loading times I tend to split them up into parts. I would rather they were longer & more work and make sure I include as much information as possible.
Thursday, 15 September 2011
Cobbling Soles On Moccasins & Shoes..
Cobbling Soles on Moccasins & Shoes.
Cobbling soles on woodland Indian moccasins is not traditional, but it is an easy way to attach & replace extra soles. The moccasins I wear in the woods have extra soles stitched on, but my work moccasins have cobbled soles because the soles wear out faster & need replacing more often.
 My iron last secured in my post vice.
 You need 2 inner soles plus the outer sole or half soles. One inner sole to attach the outer sole to, & one inner sole to protect the feet against any shoe tacks that may not be laying flat.

This half sole is worn through & is being pulled off prior to replacement.
 A new half sole is marked for cutting to shape.
 I cut the sole to shape with my jack knife. Now it needs tacking in place.


I start hammering in shoe tacks from the toe back, alternating from one side to the other to keep the sole even.
 The finished half-sole tacked in place.

When repairing the heel I just turn the moccasin round on the last & push the toe of the last into the heel of the moccasin, rather than using the smaller heel dolly on the last. But for shoes you will need to turn the iron last round & use the heel dolly to repair the heel.

Here you can see the tacks inside the moccasin where they are bent over at the tips when they are hammered through the leather & come in contact with the iron last.
All that is left to do now is to replace the second inner sole, which just slips in to the moccasin for extra protection for your feet.
Cobbling soles on woodland Indian moccasins is not traditional, but it is an easy way to attach & replace extra soles. The moccasins I wear in the woods have extra soles stitched on, but my work moccasins have cobbled soles because the soles wear out faster & need replacing more often.


This half sole is worn through & is being pulled off prior to replacement.


I start hammering in shoe tacks from the toe back, alternating from one side to the other to keep the sole even.


When repairing the heel I just turn the moccasin round on the last & push the toe of the last into the heel of the moccasin, rather than using the smaller heel dolly on the last. But for shoes you will need to turn the iron last round & use the heel dolly to repair the heel.

Here you can see the tacks inside the moccasin where they are bent over at the tips when they are hammered through the leather & come in contact with the iron last.
All that is left to do now is to replace the second inner sole, which just slips in to the moccasin for extra protection for your feet.
Friday, 5 August 2011
Getting Started.
If you are a part of this group (The NECLHG 1680-1760), then your time period will be somewhere between 1700 and 1760ad. If this is your chosen time period, then the first thing you need to do is choose a persona for yourself (you can have more than one if you wish). Your persona is what & who you are. We do not interpret historical people like George Washington, or Daniel Boone, but you can be military or a woodsman like Boone. Women can also be woodsrunners just like woodsmen. Ann Bailey & Mrs Pentry were both woods women. Woods woman clothing can be the same as woodsmen's clothing, or it can be a mix of woodsman's clothing & woman's clothing.
The next thing you need to do having chosen your persona, is to research that persona. You need to know what they wore, what equipment they used & the skills they needed. Once you have this information, you need to start clothing & equiping yourself in the manner of your persona.
As the personas available are many, I will start with the woodsrunner. This is for both men & women.

You can start wherever you wish, but if you intend to participate in our activities, then you need to "fit in". Imagine if you were suddenly transported back to the 18th century. Your modern clothing would set you apart, make you stand out. One of the best experiences we have is feeling that we have in fact just been transported back to the 18th century. Everything we wear & use fits into that period, & it feels very real. If you do not fit in, then it spoils this effect for everyone else. We don't mind you attending in modern clothing so you can see what we do, but we do like to see you making some progress toward fitting in if you intend to stay the course.
The frock covers all, well almost so. It is made on the same pattern as the shirt, but it is of a heavier material & it is a little longer than the period shirt. Take a look at the image above. We only use period materials for our clothing & equipment, but if you are allergic to natural materials then we will allow you to use something else. The above frock is made of linen, but if this is too expensive for you, you can use cotton.

Second hand materials are fine, my first period shirt was made from a second hand linen tablecloth, & it was the best shirt I ever owned. It lasted for many years. Heavy bed sheets also work well for shirts & frocks & even weskits/waistcoats. Another alternative is the modern pullover work shirt which comes in a kaki or tan colour. Get an oversized shirt. Unpick the pockets, remove the buttons. Replace the cuff buttons with bone buttons. This will get you through until you can make the real thing.

Trousers & plain leather shoes will work temporarily, but breechclout, woodland Indian leggings & moccasins would be even better. Remember, the frock comes down quite low, & within practicality it can be as long as you like.

Seeing as we are in Australia, I suggest you stick with a low crowned wide brimmed hat in either straw or felt. These too can often be found in op-shops along with leather clothing for making leggings, & materials such as bed sheets for making other clothing.
Links for shirt pattern: http://www.marquise.de/en/1700/howto/maenner/18hemd.shtml
http://www.gentlemenoffortune.com/basic_kit.htm
The next thing you need to do having chosen your persona, is to research that persona. You need to know what they wore, what equipment they used & the skills they needed. Once you have this information, you need to start clothing & equiping yourself in the manner of your persona.
As the personas available are many, I will start with the woodsrunner. This is for both men & women.

The frock was designed to cover all, to protect one's under clothing. This one I am wearing is in the English style, but similar ones were worn in France & throughout Europe. Usually made of linen or tow cloth.
You can start wherever you wish, but if you intend to participate in our activities, then you need to "fit in". Imagine if you were suddenly transported back to the 18th century. Your modern clothing would set you apart, make you stand out. One of the best experiences we have is feeling that we have in fact just been transported back to the 18th century. Everything we wear & use fits into that period, & it feels very real. If you do not fit in, then it spoils this effect for everyone else. We don't mind you attending in modern clothing so you can see what we do, but we do like to see you making some progress toward fitting in if you intend to stay the course.
The frock covers all, well almost so. It is made on the same pattern as the shirt, but it is of a heavier material & it is a little longer than the period shirt. Take a look at the image above. We only use period materials for our clothing & equipment, but if you are allergic to natural materials then we will allow you to use something else. The above frock is made of linen, but if this is too expensive for you, you can use cotton.

The breechclout needs to be as long as you are tall, though some people have longer legs or longer upper body, so it is advisable to use a tape measure & see how it is going to fit.
Second hand materials are fine, my first period shirt was made from a second hand linen tablecloth, & it was the best shirt I ever owned. It lasted for many years. Heavy bed sheets also work well for shirts & frocks & even weskits/waistcoats. Another alternative is the modern pullover work shirt which comes in a kaki or tan colour. Get an oversized shirt. Unpick the pockets, remove the buttons. Replace the cuff buttons with bone buttons. This will get you through until you can make the real thing.

Woodland Indian leggings can be made of wool or leather. They have side flaps and reach from the foot to just above the knee. No higher than mid thigh. A leather thong is attached to the tops & it is secured to a leather tie about the waist. They are secured at the knee with garters.
Trousers & plain leather shoes will work temporarily, but breechclout, woodland Indian leggings & moccasins would be even better. Remember, the frock comes down quite low, & within practicality it can be as long as you like.

My woodland Indian centre seam moccasins. I attach the flaps seperately & make them longer for more protection against snakes. They wrap around above my ankle. I stitch on extra soles which makes them last longer and easier to repair. I can still feel the ground beneath my feet.
Seeing as we are in Australia, I suggest you stick with a low crowned wide brimmed hat in either straw or felt. These too can often be found in op-shops along with leather clothing for making leggings, & materials such as bed sheets for making other clothing.
Links for shirt pattern: http://www.marquise.de/en/1700/howto/maenner/18hemd.shtml
http://www.gentlemenoffortune.com/basic_kit.htm
Subscribe to:
Posts (Atom)