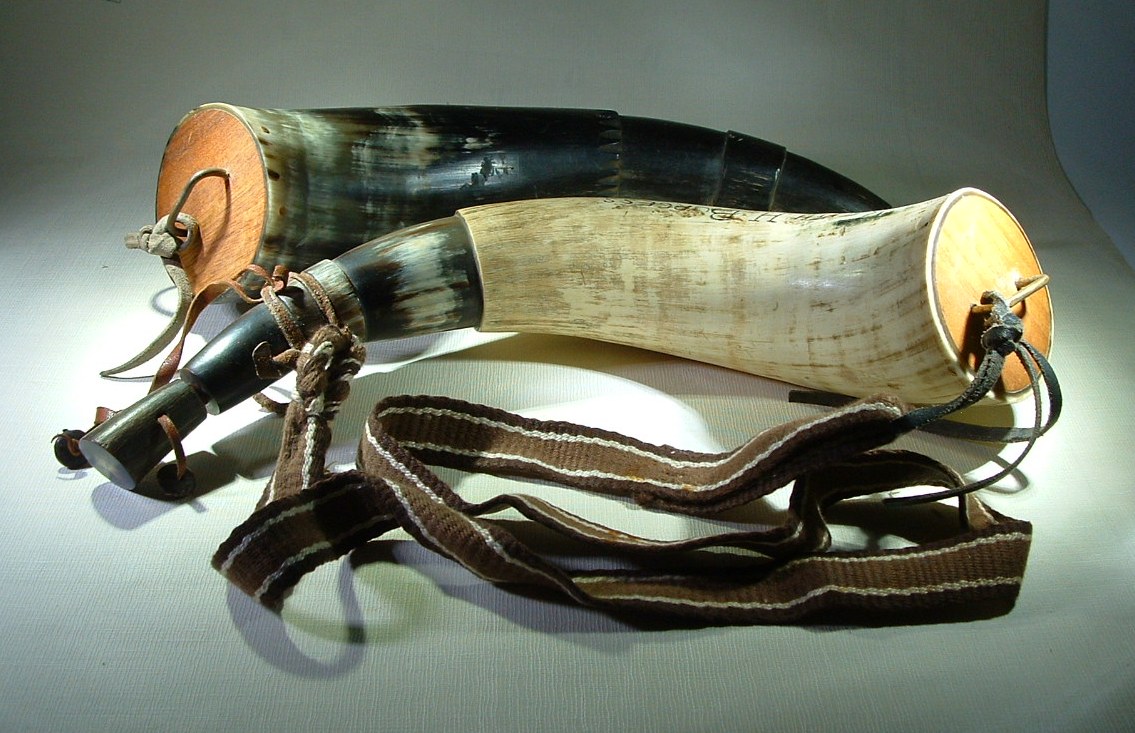
A LIVING HISTORY BLOG.

18TH CENTURY LIVING HISTORY IN AUSTRALIA.
Showing posts with label powder horns. Show all posts

Monday, 31 December 2018

Making A Powder Horn.


I have had a request to demonstrate how to make a powder horn by one of my video channel followers, Tony, but I do not have the time at present or in the near future to make a video of this, so I am going to try & explain how it is done here with images.

The very first thing I do is cut off the tip of the horn & drill the hole for the pouring spout. The reason for this is that if I make a mistake drilling the spout, then at least I have not wasted much time & I can start again with another horn. I recommend that you use hand tools as I do & take your time getting it right.

Cow horns are the best choice for a powder horn, bull horns tend to have less hollow space & more solid horn extending from the tip into the horn.


You can make the hole any size that suits the horn, from a 1/4 inch to 1/2 an inch. You can use a piece of dowel for a plug, or you can make your own plug. The plug will need to be slightly tapered so that it will fit securely into the spout. Making the spout plug can be done at any stage, it is the last thing I do when making a horn.

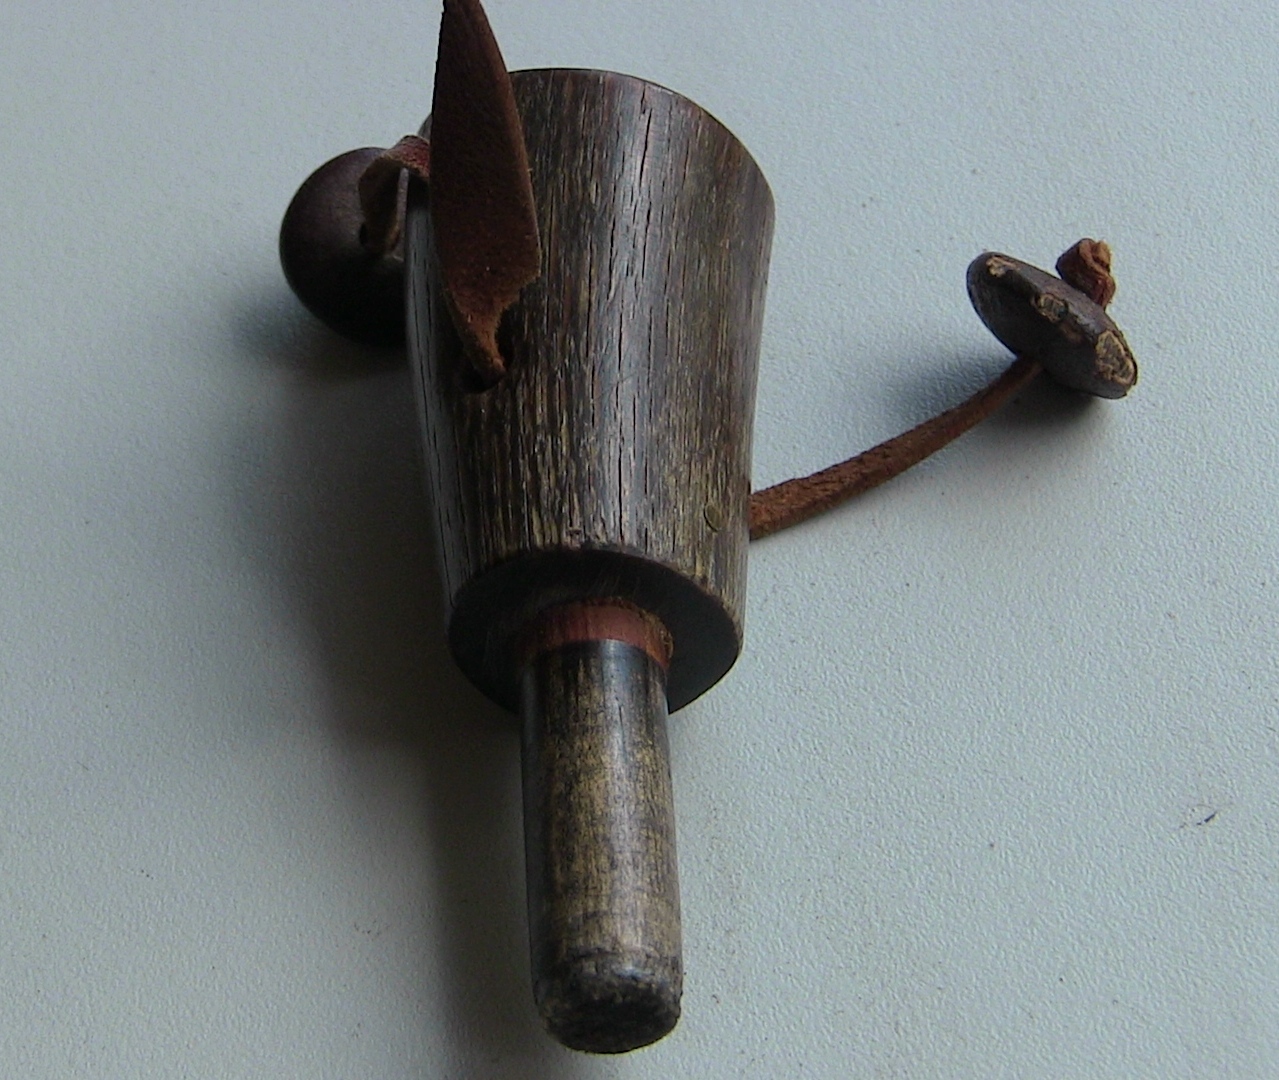
I used the tip I cut from this horn to make a cap for the spout plug.

Next I cut off the base plug end of the horn to get rid of any ragged edges. This image shows the base of an original horn & base plug. 

I then choose the wood for my base plug. It can be of any timber you wish, a board from the local hardware store, or you can rive a board of your own. Place the base of the horn on the wood board & draw around it with a pencil. Next cut out the shape you have drawn.

I shape the base plug with a horse hoof rasp, shaping it to the concave of the inner part of the horn. Every now & then I try the plug in the base of the horn & make a pencil mark around the plug at the edge of the horn so I can see where I need to remove wood.
When it is close to fitting, I finish with sand or glass paper for a smoother finish. Once the plug fits nicely in the base of the horn, I melt beeswax around the edge of the base plug & push it into the horn.


DO NOT glue the base plug to secure it in the horn, this base plug also acts as a safety release valve if the horn should ever take a spark & explode. Rather than the horn shattering into your side, the pressure from the explosion will blow the base plug out of the horn.

Secure the base plug with 4-6 metal or wooden pins.


This horn sent to me from Scotland uses small tacks to secure the plug. Once this part of the making is done, blow into the horn to make sure it is totally sealed. If air escapes around the base plug, simply melt some more beeswax around the edge & rub it in with your hand.

Next you need to add a staple to the base plug to secure the carry strap to. You also need to shape a groove around the horn at the spout end to secure the carry strap. This is a good time to file any design into the horn if you so desire, or you can just leave it plain. All shaping I do with a horse hoof rasp, a round bastard metal file & a fine flat metal file.


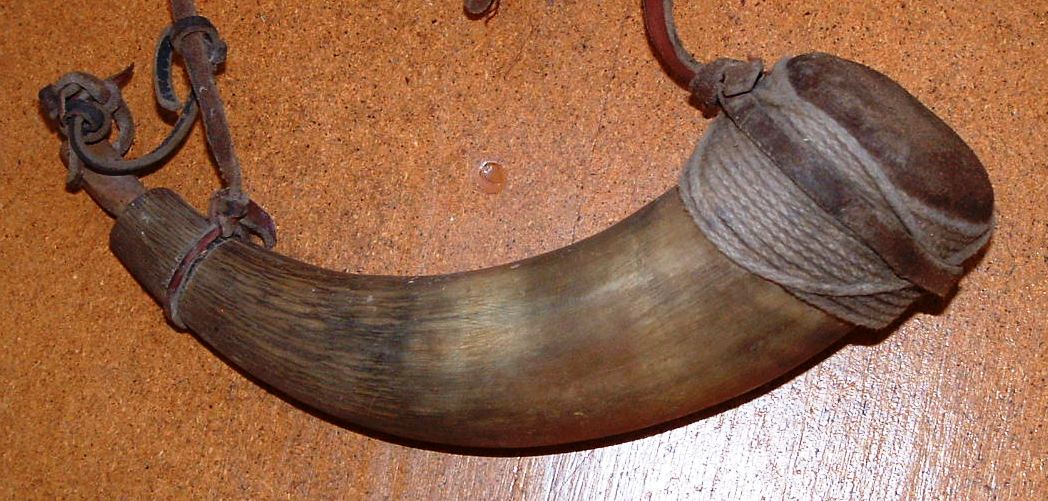
This lower horn was the very first horn I made when I had few tools to work with out bush, so I made a leather base cover instead of a wooden plug. The spout plug I carved with a clasp knife.

The final polishing of the horn I do with wool fleece & wood ashes as per original horn work in the 18th century.

If you have any questions, please do not hesitate to contact me.

Keith.


Monday, 1 May 2017

Monday, 13 February 2017

Wood Bison & Powder Horns.


"Woodland buffalo east of the Appalachians were hunted to extinction by the end of the 17th century, making their horns difficult if not impossible to obtain for powder horns.  Powder horns made from Woodland bison during the Colonial wars are unknown.  Most of the Woodland bison horns are plain.  Rare examples of these horns have a pattern of brass pins hammered into the butt plug of the horn.   Within a circle of pins there is a design of pins.  Based on Indian lore, Some researchers believe that the pattern of pins represent a constellation of stars visible on the night a baby was born, giving the child a lifetime sign".


Sunday, 6 July 2014

More Info On Making Powder Horns.

Many of you will remember the post and video that I made on gunpowder horn safety http://woodsrunnersdiary.blogspot.com.au/2014/04/a-powder-horn-safety-test-in-belgium.html . That post prompted a powder horn maker to contact me and tell me that he and many of his powder horn maker friends were not at all pleased with me. They you see seal the butt plug on their horns they make for sale with modern epoxy glues!!!  They do not want to admit that they are wrong, because (a) they have been using epoxy for years, and (b) I suspect they are concerned that if they admit they are wrong, then they leave themselves open to liability if one of their horns blows up and injures or kills someone.
Now by not using glue, I am not saying that the horn will not split on the sides, but what I am saying is that if the butt plug is not glued, and it blows out if the horn explodes, then this will release a lot of the pressure and you are more likely to survive with minor injuries or no injuries at all. Anyway, I have been doing some research and contacting some professional horners, and below are their comments on this issue.
You decide, which you think is safer, to glue the butt plug in, or just to make sure it seals well without using glue. To me this is just plain common sense, also they did not have epoxy glues back in the 18th and 19th centuries.


Two original powder horns with the butt plug not present in the horn. There appears to be no sign of anything having been used to secure the butt plug except pegs or nails. Many it seems were just a very close fit and nothing was used to seal around the butt plug. Others have reportedly had beeswax, beeswax and tallow, tallow and even hemp was used to cork the seam if it leaked.


Sunday, 9 December 2012

Research,Research, Research.

I have mentioned the importance of research many times before, but it never hurts to remind people. Some mistakes in what you use may just cost you some embarrasment among your fellow living historians, others can be a lot more dangerous. I contacted a well known trader some time ago regarding the authenticity of his wares, in particular his 18th century copper kettles. He said the copper kettle in question had been authenticated by the maker!!! Sorry, not good enough. People spend a lot of money on this stuff, and although you can say "well they should do their own research", the fact is that some people don't, and they put their trust in the trader.
This Trader's image suggests that this copper kettle is 18th century. I have yet to see an 18th century kettle of this size. If one existed, and documentation exists, then I would genuinly appreciate someone showing it to me.
 
Powder horns it must be said are like a bomb hanging off your shoulder. I know this sounds frightening, and the last thing I want to do is put people off the sport or stop living historians from carrying their powder horns, but the danger exists.
There are several ways in which a powder horn can explode. One is if you leave the stopper out after loading and a spark gets into the horn from you firing your gun. Another is wearing the powder horn when lighting the camp fire. The stopper in the end of the horn can build up a black powder residue around the stopper, and a spark landing on this can result in an explosion.
For these reasons, the base plug is NEVER glued to secure it. It is only sealed with beeswax and secured with no more than 6-8 small pins or wooden pegs the size of a toothpick. The reason for this is so that IF the horn should explode, the pressure will blow the base plug out of the horn instead of fracturing the horn.

This horn was made by a proffessional hornsmith, he sells these horns for a living. Note the copper reenforcing buttplate over the top of the plug. Note how many nails are securing this plate and the plug. The description also states that this horn is scraped thin enough to be able to see through it. So the horn sides are weak, and the base plug is strongly secured!
Seeing as this manufacturer has seeminly no knowledge of the danger he is creating for his clients with this horn, I would strongly question the safety of the other horns that he makes.
If you are going to purchase a powder horn, ask the seller how it has been constructed. If he/she can't tell you with any certainty, go somewhere else. Place your life in your own hands, not in the hands of the trader or the manufacturer.
The other problem with bought horns, is that some makers do not seal the plug with beeswax, and powder residue can leak around the base plug. The danger here is obvious. Blow into the horn and see if it is sealed.
 

Thursday, 11 October 2012

Sudden Cold Weather, So I Raided The Bee Hive For My Powder Horns!

Cold weather slowed the bees down a bit, so I risked putting my hand in there and extracted my powder horns.
 Here at last is an image of the second powder horn I made. Again, not flash, pretty ordinary, but it works. I did not bother cutting back the outside layer of horn as I did with my present gunpowder horn.
Another one of my horns. This one belonged to a close friend of mine. He used a Brown Bess musket.

Monday, 17 January 2011

French Engraved Powder Horns.

Chistine from www.kristinsawyer.com  contacted me asking if I knew of any French engraved powder horns. Well I think I found a couple for Christine, but their French heritage has a big question mark over it. Certainly one has a Fleurdelis engraved on it, and  bears a French name, but this does not make it conclusive. The other comes from Montreal and is believed to be French. I did some more thinking on this matter and decided to see if I could find more information. I was astounded by the lack of information on the net! Still the search goes on. If anyone has any info on French engraved powder horns, please contact me.
Thank you.


This lower example is made of leather. Images supplied by Steven Lalioff.


Wednesday, 12 January 2011

"Williamite soldiers circa 1695 with priming horns"?

"Saw you rpost on the New England Colonial Living HIstory site as well and you made a note that you have not seen any evidence of priming horns.

On the Baltimore Rangers website in our Historical images section is a woodcut of Williamite soldiers circa 1695 with priming horns".
Oh, and glad you like our site :)
John Machate
http://www.baltimorerangers.org/index2.html

This is the image from the Baltimore Rangers site.

I must say here that I know John Machate through other living history sites, and I hold him in high regard. John is a dedicated living historian with a good reputation. However, looking at the above image I am still not convinced that these are priming horns they are carrying. For one thing the horns size, they look to me to be main powder horns. For another they are slung too low for priming but not too low to use a powder measure for a main charge.
What are you're thoughts on this?

My thanks to John Machate for bringing this image to my attention, and for his comments. Very much appreciated.

Sunday, 16 May 2010

18th Century Multi-Purpose Equipment. Making Fire.


The lock on my flintlock fusil can be used to make fire, by placing tinder in the pan instead of gunpowder and going through the procedure for firing the gun. Sparks shower on to the tinder, and the smouldering tinder is tipped into a dry grass kindling nest and blown into flame.


Also gunpowder (black powder) can be used to make fire by rubbing a little into some unprepared tinder or even your handkerchief or neckerchief, you can then strike sparks onto this to make fire.

Unprepared tinder stored in a powder wallet/bag will absorb gunpowder dust, and this too can be used to make fire.

My greased leather gunpowder wallet.

Monday, 2 November 2009

Early to mid 18th century equipment & accoutrements.

This is my knapsack with my blanket and oilcloth tied to the straps. Again variations of these packs were carried by military and civilians.
This pack is used for carrying the bulk of your equipment and food rations. In the bedroll I also carry a: wool shirt, wool weskit, and a wool Monmouth cap for use at night in winter. When travelling by water I wrap the blanket roll in the oilcloth, but when on foot I keep it seperate. If it starts to rain and I am still on the trail I can quickly untie the oilcloth and put it over me to keep myself and my packs dry, or I can set up a quick shelter where I am.
This is my haversack. This bag has a variety of names depending on who is using it and what they are using it for. Bread bag, food bag, it does not matter what you call it, it is generally used for carrying food rations on the trail or for foraging. It can be used to carry an extra water bottle or for collecting fire lighting materials along the trail. This type of bag was used by civilians, militia, and military.

This is my shot pouch & powder horn. This pouch has to carry everything I need to use & service my 20 gauge fusil. The horn is not attached to the shot pouch as some were later in the century.
On the shot pouch strap there are: vent pick, pan brush, powder measure, ball block, & vent quills. The shot pouch strap is finger woven in two lengths and then sewn together as some originals were. The powder horn strap is loom woven.
Not all shot pouches used a button closure on the flap, but I have one on this pouch. It is quick and easy to release and if I take a fall I will not drop everything out of my shot pouch.