A LIVING HISTORY BLOG.

18TH CENTURY LIVING HISTORY IN AUSTRALIA.

Friday, 30 April 2010

Clothing and Equipment.

Clothing and Equipment Guide for the New England Colonial Living History Group.


This clothing and equipment list is based on a civilian lifestyle with the men having to occasionally attend militia musters and scouts. Women may also participate in Historical Trekking but if attending militia scouts they are required to dress in part or wholly in men’s clothing.


This list is a guide only, and you will need to do your own research to help you in your personal choices of clothing types and colours and the equipment and tools you wish to use and carry.


Civilian men’s clothing.
• Low crowned wool felt hat.
• Linen or cotton shirt.
• Linen or cotton neckcloth/neckerchief.
• Linen/wool/leather breeches.
• Linen or woollen stockings or socks.
• Leather shoes or moccasins.
• Wool or linen weskit/waistcoat.
• Men’s work frock or frock coat.
• Leather leggings and garters (optional).


Civilian woman’s clothing.
• Shift/chemise.
• Linen or woollen stockings.
• Garters.
• Mobcap.
• Straw hat (optional).
• Stays.
• Pockets.
• Panniers (formal wear only).
• Underpetticoat.
• Overpetticoat.
• Kerchief.
• Stomacher (open front clothing).
• Gown.
• Bodice (closed front clothing).
• Cloak.
• Apron.
• Shoes.


Woodsman and woodswoman clothing.
• Low crowned wool felt hat.
• Linen or cotton shirt.
• Linen or cotton neckcloth/neckerchief.
• Linen/wool/leather breeches or breechclout.
• Linen or woollen stockings or socks (optional).
• Linen or wool weskit/waistcoat.
• Men’s work frock or frock coat.
• Leather or woollen Indian style leggings, garters, and waist tie.
• Moccasins.
• Leather waist belt or wool woven sash.


Alternate clothing for women.
Some women like Ann Bailey wore a mixture of men and women’s clothing. The mix is totally your choice.

Other images of men and women’s clothing.


Woodland Indians, white, black and native.


Captives were often adopted into Indian society and as such were considered to be Indian in every respect.


Men’s clothing.
• Linen or cotton shirt.
• Breechclout and waist tie.
• Wool or leather leggings and garters.
• Moccasins.
• Wool woven sash.
• Frock coat or matchcoat or frock or any combination.


Women’s clothing.
• Leather or wool woven waist tie for legging ties.
• Linen or cotton shirt.
• Wool woven sash.
• Wrap around skirt.
• Wool or leather leggings and garters.
• Frock coat or matchcoat.
• Moccasins.


Equipment.


If you have a trade or a craft which you intend to practice then you will need the tools and equipment for that trade or craft. Also there are “toys”, accessories for both men and women such as a pocket watch or a chatelaine with scissors and other accessories.


Men from the age of 16 years to 60 years were expected to join the local militia. About town these men may carry such items as pocket pistols, swords, or a cane if they were wealthy, but if they were the “middling sort”, then they would carry these items only when attending militia musters. For militia musters they would be required to carry:

• "one good Musket, Fuzee or other Firelock, well fixed, a Cutlass, Bayonet or Tomahawk, a Cartouche Box filled with 12 or more Cartridges of Powder, 12 or more sizeable Bullets and 3 Good Flints." 1757.


• "Each soldier to provide himself with a good fire arm, a steel or iron ram rod and a spring for same, a worm, a priming wire and brush, a bayonet fitted to his gun, a scabbard and belt thereof, a cutting sword or tomahawk or hatchet, a cartridge box holding fifteen rounds at least, a hundred buckshot, six flints, one pound of powder, forty leaden balls fitted to the gun, a knapsack and blanket, a canteen or wooden bottle to hold one quart." (Journal of Arthur Harris of the Bridgewater Coy of Militia.)


• I gave orders to them to go home and fetch their arms whether guns, swords, pitchforks, axes or whatsoever might be of use against the enemy and for three days provision in their knapsacks”(early 18th century).

On top of this of course is any personal items that you may wish to carry, such as a snapsack instead of a knapsack, or a clasp knife, shot pouch, powder horn, gun tools, spare lock parts, a leather costrel, a pistol, a cup, small trade kettle, a wooden spoon.

French Militia.
EQUIPMENT FOR THE MILITIAMAN DURING SUMMER:
1 blanket; 1 capot or bougrine; 2 cotton shirts; 1 breech cloth; 1 pair of leggings; 2 skeins of thread; 6 needles; 1 awl; 1 firesteel; 6 gunflints; 1 butcher knife; 1 comb; 1 gunworm; 1 tomahawk; 1 pair moccasins every month.

For The Winter Equipment In Addition To The Summer One: 2 pairs of short stockings; 1 pair of mittens; 1 vest; 2 folding knives;


1/2 aune of blanket to make leggings; 2 pair of deerskin shoes; 1 greased deerskin; 2 portage collars; 1 toboggan; 1 pair of snowshoes; 1 bearskin.


4. AUGMENTATION FOR EVERY SOLDIER AND MILITIAMAN:


1/2 pound (livre) of gunpowder; 1 pound (livre) of balls; 1 pound (livre) of tobacco; 1 axe for 2 men; 1 tarpaulin and 1 cooking boiler for every 4 men

Woodsman and Woodswomen Equipment.

The above French equipment is a good guide for woodsrunners. But again there may be other personal items that you consider necessary when travelling far from home such as a powder wallet or bag for carrying extra gunpowder or storing spare tinder fungus, or a crooked knife used for making anything from a wooden spoon to a canoe or survival bow and arrows. Plus of course your choice of gun and shot pouch, probably an oil cloth for shelter and perhaps an extra butcher knife carried in your pack or tucked inside the top of your leggings. If you look over the militia list you will see other items.


Spectacles need to be of period design, so research these carefully. I decided to use 17th century eye glasses so that I know they will fit into any period early or late 18th century.


Or if you only need reading glasses you could use a reading glass instead.

Saturday, 24 April 2010

Early Settlers in the New World 2.

Early Settlers in the New World.

My Friend's Fusil.

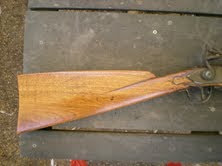
Recently a close friend of mine was given an old fusil. It is a 24 gauge. In the early to mid 18th fur trade 24 and 20 gauge fusils were most popular. This fusil has sling attachments such as those fusils used by military officers, it also has a barrel band which I don't think were common on later fusils.
The butt stock on this gun was too large for my friend to use, so he has cut and reshaped the stock to fit himself.
The original stock.

The stock after reshaping.

Note the sling attachment just in front of the trigger guard. The large trigger guard is reminiscent of the early trade fusils.

Thursday, 22 April 2010

Dressing A Rabbit.

This is a good video, well presented. Larger game can be butchered in exactly the same manner whether on the ground or hanging by the back legs. The backstraps though will have to be cut out rather than pulling out, and of course you will still have the ribs to remove.

One Way Of Skinning A Rabbit.

Tuesday, 20 April 2010

Three National Geo Videos.

There are three videos on the following site that I found really interesting and well worth watching.

http://www.survival-spot.com/survival-blog/guns-germs-steel/?utm_source=feedburner&utm_medium=feed&utm_campaign=Feed%3A+survivalspotblog+%28Survival+Spot+Blog%29&utm_content=Google+Feedfetcher

Wooden Water Flasks.

This video was taken in Romania, where these wooden flasks have been made this way for centuries. The flask he is making dates back to the 15th century, but they are still making and using them! The skill in this video is top class, and you can see that the old traditional tools are still being used. Also note the small wagon in the background. Many people in places like Romania and Russia still rely on skills and equipment from a past era.


These two flasks were produced by Robin Wood at:

Wednesday, 14 April 2010

The Woolen Frock!

For a long time now I have been researching the woolen frock, also known as a "Guernsey Frock". Information has not been forthcoming with many emails and letters sent overseas and no replies recieved. Even so I have managed to find bits and pieces here and there and I have slowly been piecing them together.
So for those of you looking for period woolen clothing to wear for winter, here is what I have on the woollen frock.
French frocks, the one at top is probably either linen, or a course tow cloth. The one below looks like a woollen frock.


"Those who inhabit the North are more rude, homely and unruly, and for this reason are called "wild". They wear like the Irish a large and full shirt, coloured with saffron, and over this a garment hanging to the knee, of coarse wool, after the fashion of a cassock."-1583, Nicolay d'Arfeville.


http://www.historicgames.com/Scottishstuff/scotsattire.html

There was a skipper hailing from far west
He came from Dartmouth so I understood
He rode a farmed horse as best he coud
In a woollen gown that reached his knee.
Chaucer’s ‘Canterbury Tales’ 1380s.

When the garment was to be used as an ‘overall’ a rather different textile was used. The smock that was worn in the summer was made of strong hardwearing cotton or linen twill, and the frock worn in winter was made of heavy woollen molton. Both these textiles were imported into Guernsey. The nearest modern equivalents are the material from which men’s boiler suits are made, for a summer smock, and the woollen cloth used for duffel coats for a winter one.


A Guernsey Frock.

The English frock, whilst having the same basic idea of protecting clothes, became heavily embroidered during the 19th century with significant patterns. The Guernsey frock has never had this type of decoration, and the feather stitch embroidery sometimes found on the woollen frock is not significant. According to oral tradition the frock has always been made in two lengths, a shorter version for the man doing the work and a longer version for the man in charge.


However, the local Guernsey French names for the garments are quite distinctive, and leave no room for doubt. The long woollen molton frock, worn during the winter particularly by fishermen as it was both wind and to a great extent water proof, was called a ‘cheminsole’ or ‘un froc’, and the Norman word ‘frot’ means thick woollen material. The shorter cotton frock worn in summer was known as ‘aen blaouse’, which in French means a loose protective over-garment.

Another French Frock.

So, references to a Guernsey frock, a Guernsey shirt, a smock-frock, or fishermen’s frocks are basically one and the same garment, made out of different material when worn for different purposes by different people, but made to the same design.


The frock is made from a series of squares, oblongs and triangles cleverly put together to make a garment which gives fullness where needed, that is across the shoulders and at the elbows, but does not get in the way when one bends or leans forward. The back and front of the cotton frock are gathered at the collar, and the sleeves are gathered at armhole and cuff. It is sewn together with linen thread. The woollen frock is pleated at the armholes and cuffs, and is sewn together with the same wool from which the Guernsey jumper is made. The buttons are made of bone.


Made from three yards [2m 70cms] of material the body of the garment takes two yards [1m 80cms] of 36 inch wide [90cm] material. The rest of the garment is cut from the remaining yard, by cleverly folding the cloth into squares which are then further cut into oblongs or triangles.
Blog author in his English style linen frock.


"… every one retains the same garb their ancestors wore in the days of Hugh Capet and King Pippin, each man religiously preserving his vast blue trunk breeches … and a coat almost like a Dutch froes vest, or one of your Waterman liveries …"‘The Fief of Sark’ by Ewen & De Carteret Mid 17thc.


Hugh Capet and King Pippin were French kings of the 700s, but the expression came to mean anything old or unfashionable. Frieze was a napped woollen cloth, and a Dutch frieze vest was a coat which reached down to the knees, with sleeves. Even today the livery of the Watermen on the River Thames in England is identical to the short Guernsey smock.


"Men’s everyday clothes during the 18th 19th and early 20th centuries consisted of fustian trousers, a woollen guernsey covered by a plain or striped smock, still called a cheminsole as in earlier times. This cheminsole had none of the intricate stitchery found on the English smock."[4] Marie de Garis.


Frocks and short breeches to which were attached long stockings with heavy shoes.' Guernsey people emigrating to the New World.

Gillian Lenfestey
Costume Curator, NTG Guernsey Folk & Costume Museum
CostumeCurator@NTGuernsey.com
http://www.nationaltrust-gsy.org.gg/content.aspx?p=137

1. Extentes of Guernsey 1309.
2. Jersey French Dictionary. Le Maistre.
3. The Fief of Sark. Ewen & De Carteret. Guernsey Press Co. Ltd. 1969 p.75
4. The Garments they wore. M de Garis. Review of the Guernsey Society. Vol. XXXII No.1. Spring 1976. p.6.

I would like to thank Gillian Lenfestey, costume curator at the Guernsey Folk and Costume Museum UK, for the article and information above.

Images and editing by Le Loup.

Tuesday, 13 April 2010

Firewood and Chimney Fires.

The main cause of chimney fires is a build up of creosote in the chimney. This in turn can set fire to thatched roofs. Our family home was built in 1740, similar to the one below but another story higher. Cellar, ground floor, first floor, second floor, attic and loft. My bedroom was on the top floor, but the fires were only on the ground floor and the first floor main bedroom, so it was pretty cold in my room in winter!


Fire places in the 18th century tended to be pretty big, as did the kitchens in big houses. Our kitchen was large, and you could walk into the fireplace if you stooped just a little!
 
This 18th century style fireplace below is a much smaller version used in smaller dwellings which I built in our Elm Cottage.
It has a buggy axle as a cross bar and chains and hooks for hanging kettles.

The main reason for the build up of creosote in the fireplace and chimney is the use of wet or damp firewood.
Firewood needs to be split and stacked, or at least stacked outside through a summer or two to season and dry out. Depending on how the summer weather is and how hot it gets.The sap never leaves the wood, but the moisture will. Once the wood is dry it can be moved into a wood shed or shelter and restacked in the same way.
This is some of our firewood stacked in the wood shed. We use wood all year round, just as it was in the 18th century, so there is a constant need to be felling trees, cutting and stacking, carting, splitting and restacking.
I started doing this when I was about 10 years of age. After cutting the tree down I had to cut it to a length I could drag with a rope. I dragged it home where I then had to split the log so it could be lifted into our large sawing horse.
I had to wait for my Father to come home to help me lift the split log into the sawing horse, where we would then both cut the fire logs with a crosscut saw like this one below.
I would take the handle end and my Father would take the other end. We would both push and pull. It is not easy work, but it is very satisfying. I do not have our old crosscut saw, it was too large for me to carry with me when I left England, but I did manage to find one exactly the same here.

Monday, 12 April 2010

Fascines and Fascine Knives.

From Wikipedia, the free encyclopedia


The fascine knife was a side arm / tool issued to 17th to 19th century light infantry and artillery. It served both as a personal weapon and as a tool for cutting fascines (bundles of sticks used to strengthen the sides of trenches or earth ramparts protecting the batteries).

Two original hand forged Fascine knives that belonged to my Father.

Saturday, 10 April 2010

Shaving in the 18th century.

Many people say that beards are not authentic for the 18th century, this of course simply is not true. Whislt it may be true that being clean shaven was the fashion, that does not mean that everyone was clean shaven! Having a beard is and was always a personal choice and whilst clean shaven men outnumbered those with beards, beards were still worn in the 18th century. 
This image of an 18th century razor borrowed from Smokepoles at: http://smokepoles.blogspot.com/2010/04/here-are-few-of-my-razors.html
This blog is well worth a look see and I think it will get even better as time goes on.

Apparently in the larger version of this 18th century painting three men can be seen with beards.

Twenty pounds reward

Run away from... Alexandria, Fairfax County Virginia, a convict servant man, named John Murphy, born in Ireland, about 28 Years of Age, by trade a joiner, a low set fellow, about 5 feet 4 inches high, struts in his walk, has a pale complexion, large black beard and eyebrows, wide mouth, and pleasant countenance, sings extraordinarily well, having followed it in playhouses in London, talks proper English, and that in a polite manner... It is imagined he has forged a pass and likely will deny his name, trade and place of nativity.


NB All Masters of Vessels are forbid to take him off at their Peril. (August 1760)

Radisson 1957 movie.

Thursday, 8 April 2010

Period Foods. Hackin.

Sir,


There are some Counties in England, whose Customs are never to be set aside and our Friends in Cumberland, as well as some of our Neighbours in Lancashire, and elsewhere, keep them up. It is a Custom with us every Christmas Day in the Morning, to have, what we call an Hackin, for the Breakfast of the young Men who work about our House; and if this Dish is not dressed by that time it is Day-light the Maid is led through the Town, between two Men, as fast as they can run with her up Hill and down Hill, which she accounts a great shame. But as for the Receipt to make this Hackin, which is admired so much by us, it is as follows.


Take the Bag or Paunch of a Calf, and wash it, and clean it well with Water and Salt; then take some Beef-Suet, and shred it small, and shred some Apples, after they are pared and cored, very small. Then put in some Sugar, and some Spice beaten small, a little Lemon-Peel cut very fine, and a little Salt, and a good quantity of Grouts, or whole Oat-meal, steep’d a Night in Milk; then mix these all together, and add as ma¬ny Currans pick’d clean from the Stalks, and rubb’d in a coarse Cloth; but let them not be wash’d. And when you have all rea¬dy, mix them together, and put them into the Calf’s-Bag, and tie them up, and boil them till they are enough. You may, if you will, mix up withthe whole, some Eggs beaten, which will help to bind it. This is our Custom to have ready, at the open¬ing of the Doors , on Christmas-Day in the Morning. It is esteem’d here; but all that I can say to you of it, is, that it eats somewhat like a Christmas-Pye, or is some¬what like that boil’d. I had forgot to say, that with the rest of the Ingredients, there should be some Lean of tender Beef minced small.

Wednesday, 7 April 2010

Making Clay Pots On A Foot Powered Wheel.

Developing Knife Skills By Jim Dillard, Ben's Backwoods Blog.

Developing knife skills:

Developing Knife Skills: A Scandinavian Approach to Competence with the Blade by Jim Dillard.
When bushcraft students show up to class or camp, they are always anxious to begin to work with their knife. They want to make the things they have seen in books and magazines, and by the end of the week, they hope to have a fair level of expertise in knife craft.
Too often these are folks who do not have a solid foundation in the most basic knife handling skills. They may own a respectable collection of blades, but there is a better than even chance that they have never spent the hours of work with a knife that would give them the capability they need. And through no fault of their own, most of them don’t know how to go about gaining the experience that will make them the experts they want to be.
The answer to this is simple. With a little instruction and lots of pleasurable practice, anyone can develop a solid level of competence with the knife, and it can be done right at home. Once the time is invested, an individual can enter the bush with the knowledge that they will be proficient, quick and safe with their most important tool.
The Scandinavian Solution
For a great many years the Scandinavian governments and peoples have taken great pride in their knives and their ability to use them. Most of those governments maintain federal departments charged with encouraging traditional crafts, and although now a thing of a past, their public schools at one time offered manual arts courses centered around the use of the knife. The projects and techniques used in these courses can help turn most willing beginners into top-notch bushcrafters in a relatively short time. This article will take you through one of those projects.
The Tools
First, an admonition – there are all kinds of gadgets on the market that can keep you from learning the use of basic tools. Don’t use them. The only way to acquire the know-how you need is to work with nothing but the tools you carry with you in the woods. The chain saw and the angle grinder may speed up the completion of your project, but they will only get in the way of what you want to learn.
The basic tools you will need are ax, knife and crooked knife.
The ax should be one of a high quality such as those made by Wetterlings or Gransfors Bruks. These have a hardness of about Rc 57 as opposed to discount store axes, which usually have Rockwell ratings in the 40’s. Although most folks here in the Alaskan Bush tend to use axes with handles of about 30” because of their versatility, carving with handles of 17-19” or so is easier and a bit safer.
Since the main job of the crooked knife (sometimes called a bent knife) will be to hollow, you need one with a short, deeply curved blade. If you are going to hollow small items, the crooked knife blade needs to be no wider than 1/2 “ at the base and should taper to a sharp point. The narrow part of the blade near the point will let you reach into small places such as the bowl of an eating size spoon.
Although the above tools are essential, your knife will do 90% of the work, so choose it well. Look for knives with a spear, clip or drop point. The point shouldn’t be much above the middle of the blade. Blades with a big bellies and high points are difficult to carve with. A knife for an experienced user should be between 3 and 4” long. If you aren’t sure what length you need, go with the shorter blade until you know you’re ready for the long one.
Since most bushcraft work is done with wood, a full Scandinavian bevel is a must. Beginning carvers can get quite frustrated with convex or short secondary bevels. The reason is that with these bevels it is difficult to tell the exact angle that the edge will engage the wood. One cut may be too deep and the next too shallow. With the Scandi bevel, however, all you need to do is to lay the bevel flat against the wood, raise it a few degrees and cut. It doesn’t take long to learn to quickly judge the exact angle needed to make consistent, paper-thin shavings.
For beginning carvers it is hard to beat the standard Mora model 120 carving knife. It has a laminated steel blade with a hard core that will retain an edge, and its 2 3/8” blade is safe and easy to control. Even though I carry sheath knives with longer blades, I always have a Mora 120 with me for small carving projects. Most carving schools both in this country and in Europe require the 120 for beginning students. As you become competent with the 120, you might want to also use your regular sheath knife for part of your projects so that you can learn its full potential.


The Mora model 120 and a crooked knife with a point are two of the most versatile tools a carver can own.
Getting Started
You will be working mostly with green wood. Green wood needs special care so projects do not split as a result of drying too quickly, but it carves easily and is a pleasure to use. The special care will be covered later. For eating utensils a fine-grained wood works best. Here on Kodiak Island, the only woods we have that fit that description are alder and black birch, both excellent carving woods. If you aren’t sure which wood in your area to use, contact your local woodcarvers’ club. They will be glad to help.


For a first project try a simple spoon. Using safe ax practices, cut a piece of straight, green wood about 14” long and 3” in diameter. With baton and ax, split the piece end to end just slightly off center. Removing the center of green wood lessens the chance of checking (cracking) as the wood dries, so use the smaller side for the spoon. After drawing a spoon on the wood, use the ax to begin shaping the bowl of the spoon by rounding the end of the wood and notching at the rear of the bowl. Once the drawn handle line is reached with the notch, split off all excess wood parallel to the handle. Watch the wood carefully as you work. If at any time the wood begins to check (most likely on the ends) simply dip it in water.


After notching behind the bowl, split off the excess wood with axe and baton.

Once the roughing with the ax is complete, the fun begins. Use your knife for final shaping and finishing. In tight corners such as where the bowl joins the handle, choke up on the back of the blade and use only the tip. Force yourself to learn to use every inch of the blade to its fullest potential. You will eventually be amazed at the versatility of a well-designed blade.


When carving in tight corners, use only the tip of the blade.


Contrary to what your mother once told you, almost all carving of smaller projects should be toward you. With the edge pointed toward your body, use your thumb to pull the knife through the wood, keeping the thumb to the side of the path of the edge. This way the blade will only travel a few inches instead of the wide and dangerous sweeps associated with carving away from you.


Cutting toward yourself by pulling with your thumb is safe because the blade will only travel a few controlled inches per cut.


While carving your first project, work slowly and observe the edge as it enters the wood. You will find that cutting at a slight angle to the grain direction will make chips that are smooth and easy to pare off. A standard rule is that if the wood begins to split or the blade gets stuck, cut from another angle.


By carving at a slight angle to the grain, chips will come off smooth and clean. Carving parallel to the grain (shown by arrow) the knife will get stuck or will split the wood.


Once the outside of the spoon has been completely carved, you are ready to hollow. If you must leave it over night before hollowing, take precautions to prevent checking (cracking) by dipping the piece in water and storing it in a plastic bag. If you are in the woods, use the old Alaska Native technique of packing it in wet moss or wet grass until the hollowing begins.

Draw a line just inside the outer rim of the spoon bowl. Make it about 3/16 of an inch from the edge. Then using the crooked knife palm up (with the blade closest to your little finger) hollow all around the bowl moving from the rim to the center. By hollowing toward the center, there will be no chance of chipping the edge of the bowl. Once you have carved a half-inch deep or so, you can hollow in any direction without damage to the spoon’s rim.


Always hollow toward the center until the cavity is at least a half-inch deep. This will insure that the knife doesn’t slip and cut the edge of the spoon bowl.


Once hollowed, the inside of the spoon bowl should be sanded, but sanding is best done with dry wood, so the spoon needs to cure first. Slow drying can be achieved by placing the spoon in a plastic bag. Overnight, moisture will leave the wood and condense on the inside of the bag. Each day turn the bag inside out and place the spoon back inside. This lets the moisture evaporate from the wood a little at a time. If the bag is not turned on a regular basis the moisture will cause the wood to mold.


Once moisture no longer forms on the inside of the bag, the spoon is ready to be air dried for a week or so at room temperature. A more traditional drying method is to wrap the spoon in wet moss and let the entire bundle dry slowly in the shade. When the wood is dry, sand the bowl of the spoon, oil with cooking oil or a hardening food-safe oil and use.
The Next Project


After completing the first project, challenge yourself with more complicated designs of spoons, bowls and other utensils. Patterns for projects can be found in an excellent book titled Swedish Carving Techniques by Willie Sundqvist. Although this book is currently not in print, it can be found in most libraries. Examples can also be found by searching the internet with the words “Scandinavian crafts.”


With each project you will become more competent and more at ease with your tools. I have never known a bushcrafter or woodsman who, after completing several dozen such projects, wasn’t totally competent with the knife. Because no job in the woods is more complicated than making a fine ladle, skill gained doing traditional Scandinavian woodcraft will enhance every aspect of outdoor knife use.


After completing several dozen traditional Scandinavian wooden ware projects with hand tools, the average bushcrafter will have the skills needed to do just about any knife job the wilderness requires.


Once a high level of knife skill has been achieved, projects such as this camp-made leister will be a breeze. Although an axe and a gimlet were used in making this effective fish getter, the knife did 90% of the work.


The bushcrafter’s reward. Food gathered with devices you made cooks in a wooden boil box and will be served with a newly carved ladle. All items made in camp with simple tools.
I would like to thank Jim Dillard and Ben's Backwoods for this excellent article and images. It is very much appreciated.
You can access Ben's Backwoods Blog at: http://bensbackwoods.blogspot.com/2009/11/developing-knife-skills.html

And Ben,s site at: http://www.bensbackwoods.com/servlet/StoreFront


Tuesday, 6 April 2010

Bush Blacksmithing. Forging With A Rock Anvil & Hammer.

I have not posted this for what is being made in this video, it would be far simpler to use a pointed stick!!!
But the forge method itself is one I have used, and it is worth seeing what you can do with and ordinary fire and a couple of rocks. At home I use an open fire and a piece of railway iron for an anvil.

Fabrics.

Forging A Kettle Hook.

Sunday, 4 April 2010

One Man's Idea Of Who/What a Longhunter Was.

WHO WERE THE LONG HUNTERS


The term “Long Hunter” is a product of Manifest Destiny historians,
and is used today to describe the woodsmen who hunted for extended periods of
time in the land once known as the “Middle Ground.” Today we refer to the
“Middle Ground” as the present states of Kentucky and Tennessee. Not
everyone who hunted was a Long Hunter. The true Long Hunter was a
professional, and made his living by market hunting. Many of these
professional hunters came from the western frontiers of Pennsylvania,
Virginia and the Carolinas. Over the years, legends and tales have grown to
surround and mystify the history of these remarkable characters. They were
an unusual breed, even extraordinary, for they routinely existed in the
wilderness for months, even years at a time. They roamed at will, feeding
themselves from the endless bounty of the forests. These men were perhaps the
most talented, and most enduring of their time. They had to be blacksmiths
enough to shoe horses; forge froes, frizzens, gunsprings, to repair guns and
traps. They could haft axes and tomahawks, and knap flints to fit the locks
of their rifle-guns. Such men were skilled in hunting, trapping, stalking,
hiding, reading sign, and building shelters. They were packhorse men, their
work demanding that they follow the game trails deep into the endless forests.
That they were able to survive in such an unforgiving wilderness for such
lengths of time, under such adverse conditions, is truly a testament to their
qualities of marksmanship, woodslore, self-reliance and cleverness.


Long Hunters were the first American frontiersmen to push beyond the
Blue Ridge. Contrary to the popular Hollywood image, they were not dashing
nimrods clad in fringed buckskins and coonskin caps. Nor did they trek
west to make free the land for God and country, hearth and home. Most Long
Hunters did not have use for Indians, considering them competition, and were
prone to shoot them on sight. The Long Hunter was often a plain man, a poor
man seeking land, relief from debt, and a way to feed hungry mouths. The
stark edge of life and death inured these tough, and stubborn frontier folk to
toil, hardship, heat, cold, rain, snow and ice. The Long Hunter broke treaties
and laws to trespass and poach on Indian land. He went west to make money
in deerskins, tallow and furs. He was perhaps the freest Anglo-American of
the colonial era.
The decade of the 1760’s is referred to as “the golden age” of the Long
Hunt.
Copyright Larry Fiorillo, 2001

"The long hunters principally resided in the upper country of Va., and North Carolina, on the New River and Holston River, and when they intended to make a long hunt, as they called it, they collected near the head of Holston, near where Abingdon now stands. Thence they proceeded a westerly direction passing through Powell's valley crossing the Cumberland mountain where the road now crosses leading to the Crab Orchard in Ky. Then crossing the Cumberland River where the said road now crosses Rockcastle, and leaving the Crab Orchard to the right and continuing nearly the said course, crossing the head of Green River, going on through the Barrens, crossing Big Barren River at the mouth of Drake's Creek; thence up Drake'c Creek to the head, crossing the ridge which divides the waters of the Ohio river from the waters of the Cumberland, and the hunters, after crossing the ridge, either went down Bledsoe's Creek, or Station Camp Creek to the river and then spread out in the Cumberland ready to make their hunt.


The first trip that the long hunters made was about l772 or l773. There were several very enterprising, smart, active members along. I will name a few: Col. Isaac Bledsoe, Col. John Montgomery, Col. Gasper Mansker, Henry Scaggs, Obediah Terrell, two Drakes (this would be Joseph and Ephraim), and a number of other could be named.


When the hunters crossed the dividing ridge first named, they fell on the head of Station Camp Creek, and went down it about three miles and from Cumberland river, came to a very large, plain, buffalo path, much traveled, crossing the creek at right angles north and south. The south side of the creek was a pretty high bluff and a beautiful flat ridge made down to the creek. The hunters pitched their camp on the bluff and on the buffalo path, and they made that their Station Camp from which the creek took its name.


Col. Bledsoe and Col. Mansker, the first night they pitched their camp, agreed that the buffalo path that ran by their camp must lead at each end to Sulphur Licks or springs, and they made an agreement that night for Col. Bledsoe, in the morning, to take the north end of the path, and Col. Mansker to take the south side of the path, and each to ride one half day along the path to see what discoveries they could make and give themselves time to return to camp that night and report what they had seen.


They were both successful in their expectations. One found Bledsoe's Lick at the end of thirteen miles, and the other found Mansker's Lick at about twelve miles. They both returned that night, with great joy, to their companions at the camp, and made known their discoveries of the two licks.


Col. Bledsoe told me when he came to Bledsoe's Creek, about two miles from the lick, he had some difficulty in riding along the path, the buffaloes were so crowded in the path, and on each side, that his horse could scarcely get through them, and when he got to the bend of the creek at the Lick, the whole flat surrounding the lick of about one hundred acres was principally covered with buffaloes in every direction. He said no only hundreds, but thousands.


The space containing the Sulphur springs was about two hundred yards each way across, and the buffalo had licked the dirt away several feet deep in that space, and within that space there issued out about a dozen Sulphur springs, at which the buffalo drank. Bledsoe said there was such a crowd of buffaloes in the Lick and around it, that he was afraid to get off his horse for fear of getting run over by the buffaloes, and as he sat on his horse he shot down two in the lick and the buffaloes tread them in the mud so that he could not skin them. The buffaloes did not mind the sight of him and his horse, but when the wind blew from him to them they got the scent of him, they would break and run in droves."
The Long Hunter by Emory L. Hamilton, p. 29, The Mountain Empire Genealogical Quarterly, Spring l984.